Exploding Topics
Remineralizing Gum search volume grew from under 100 to 27,100 monthly searches between February 2024 and January 2026.
Remineralizing gum
+5100%
GLP 1 Supplement search volume grew from 5,920 to 74,000 monthly searches between February 2024 and January 2026.
GLP 1 supplement
+1150%
Soursop Bitters search volume grew from 9,900 to 110,000 monthly searches between March 2024 and February 2026.
Soursop bitters
+1011%



Get Advanced Insights on Any Topic
Discover Trends 12+ Months Before Everyone Else
How We Find Trends Before They Take Off
Exploding Topics’ advanced algorithm monitors millions of unstructured data points to spot trends early on.

Keyword Research
Performance Tracking
Competitor Intelligence
Fix Your Site’s SEO Issues in 30 Seconds
Find technical issues blocking search visibility. Get prioritized, actionable fixes in seconds.
Powered by data from
Latest Blog Posts
Featured Case Studies
See what's trending before everyone else
Each week, we'll send you our best Exploding Topics. Plus, expert insight and analysis.
How to Create a Trend Validation AI Agent

 Add Exploding Topics on GoogleAdd Exploding Topics as your preferred source to see more of our stories on Google.
Starting a business is risky, and the tough decisions don’t stop once you launch your product. Market research and trend validation have to be a regular part of your ongoing strategy if you want to stay relevant and keep attracting new customers.
There are plenty of tools out there to help, but finding the time for these tasks is still a challenge. Automating the process with the help of an AI agent gives you the benefit of data-backed market research and hours saved.
Exploding Topics is the best tool for spotting trends at just the right moment so you can capitalize on their growth. It integrates with n8n to give you everything you need to build your own trend validation AI agent.
In this tutorial, I’ll walk you through how to build an AI agent in n8n with Exploding Topics, Semrush, OpenAI, and Slack. The result will be a handy assistant that delivers a numeric score for each trend it retrieves from Exploding Topics to Slack so you can decide if it’s worth pursuing further.
What Is Trend Validation?
Trend validation is a kind of market research that uses real-world data to verify if a popular topic, product, or company will likely have lasting influence on an industry, or if it’s a brief passing fad.
Incorporating trend validation in your routines is beneficial because it prevents you from investing time and capital in ideas that won’t pay off. You don’t want to spend money creating a new product that launches after everyone has lost interest in the trend.
How to Create a Trend Validation Scoring System
To build a trend validation AI agent, I’m going to create a system for scoring trends so I can quickly look at the agent’s output and know whether I want to follow up and do more research on the topics it assessed.
There’s no true “trend validation score” formula, and the factors that I think are most important might not be the ones that matter most for your business. So take this section as general guidelines rather than strict rules, and make sure to adjust your own scoring system according to your priorities.
Here are the most important factors to consider when doing a trend validation:
- Trend Velocity: How fast is interest in this trend growing, and when is it likely to peak? A trend that peaks quickly and dies off isn’t worth pursuing because you won’t have time to capitalize on consumer interest before it wanes.
- Cross-Channel Interest: Does the trend have a presence on multiple platforms? Or is it only experiencing growth in one small corner of the internet?
- Search Volume: How many people are searching for this topic online? More people looking means more opportunities for you to capture leads.
- Keyword Difficulty: How competitive is this topic from a search standpoint? If many well-known brands in your niche are already ranking for this topic, the market might be too saturated to break into.
- Brand Fit: Is the trend relevant to your customers? Even if it’s popular, if a product or topic isn’t strongly aligned with your brand’s position, your audience is unlikely to buy into it.
Using these elements, I’m going to create a 10 point scoring system to use in this tutorial:
- For trend velocity, a topic will receive one point for Exploding growth and one point for Constant growth (two possible points).
- A trend will receive a point for cross-channel interest if it has a significant presence on at least three social media platforms.
- A trend will receive one point for a search volume of over 500, or two points for a search volume of over 1,000.
- A trend will receive two points if its keyword difficulty is under 30% and one point if its keyword difficulty is between 30% and 50%.
- For brand fit, a trend will receive up to three possible points based on how relevant it is to my audience, if competitors in my niche have a comparable offer, and if it aligns with my overall brand position.
Once you’ve developed your own trend validation scoring system, you can start building your AI agent in n8n.
How to Create a Trend Validation AI Agent with Exploding Topics and n8n
To recreate the trend validation AI agent I’ve built, you’re going to need access to the following:
- Exploding Topics Pro (with API access)
- Semrush (with API access)
- OpenAI API credits (n8n provides a limited amount for free, but you may need to purchase more)
- n8n (any plan)
- Slack (free or pro)
You can also incorporate other tools if you like. Additional data sources can strengthen your trend validation, and you could send your AI agent’s output to Google Sheets or Notion if you prefer.
However, since many of these resources come with a price tag, keep your expenses in mind.
Optional: Build Your Trend Validation Agent With AI
n8n includes an AI chat and building tool in its workflow builder. You can use this feature to generate your workflow or to ask questions about different nodes for troubleshooting purposes.
In my experience, if you’re going to use the AI building feature, you need to know exactly what you want your workflow to do and make your prompt very specific to get the best results. It can be useful for giving you a starting place, but you’ll probably have to make quite a few changes before your automation is ready to run.
If you’d like to build your trend validation AI agent using n8n’s AI builder, select Build with AI when you open the workflow builder.
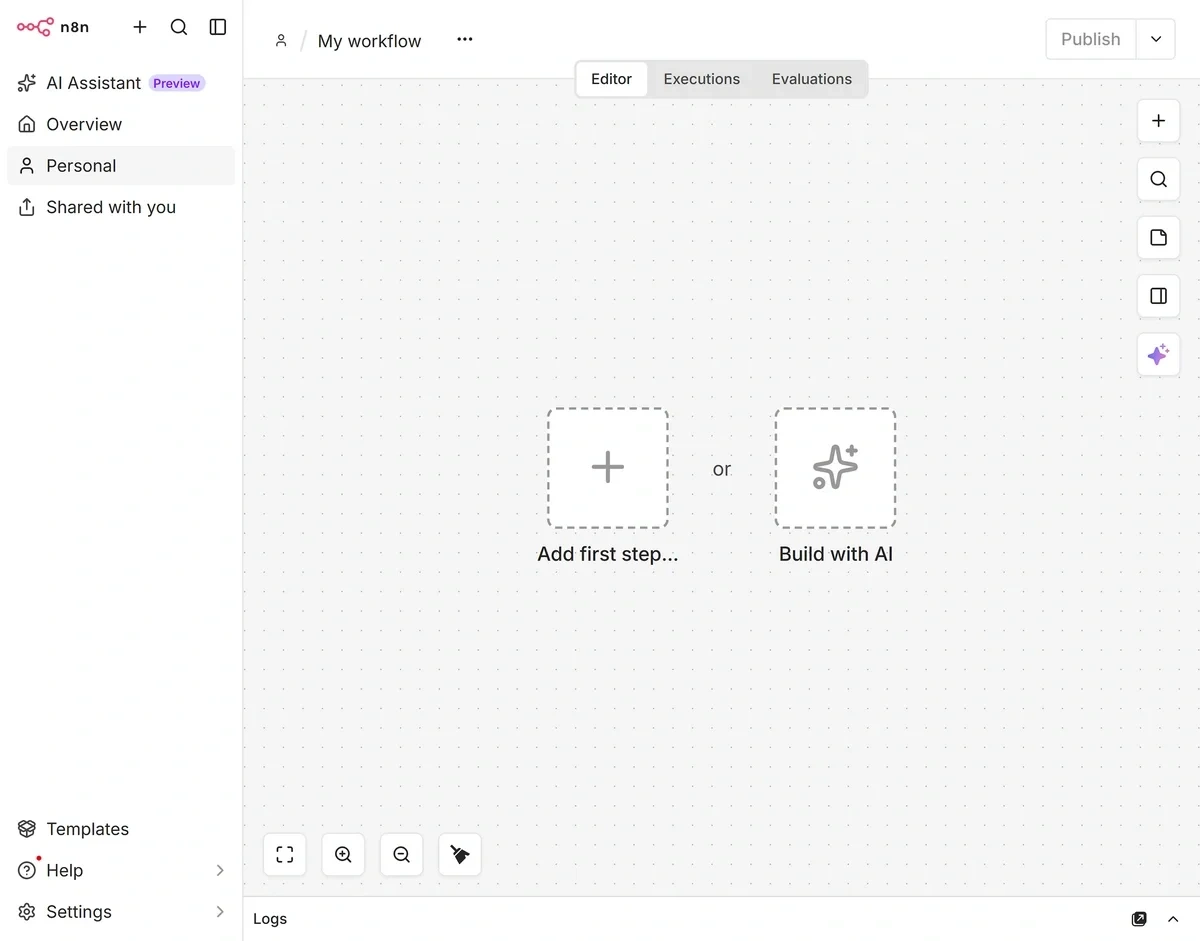
You can also access the AI chat at any time by clicking on the purple star icon on the right side of the workflow builder or in the bottom right corner of the node configuration window.
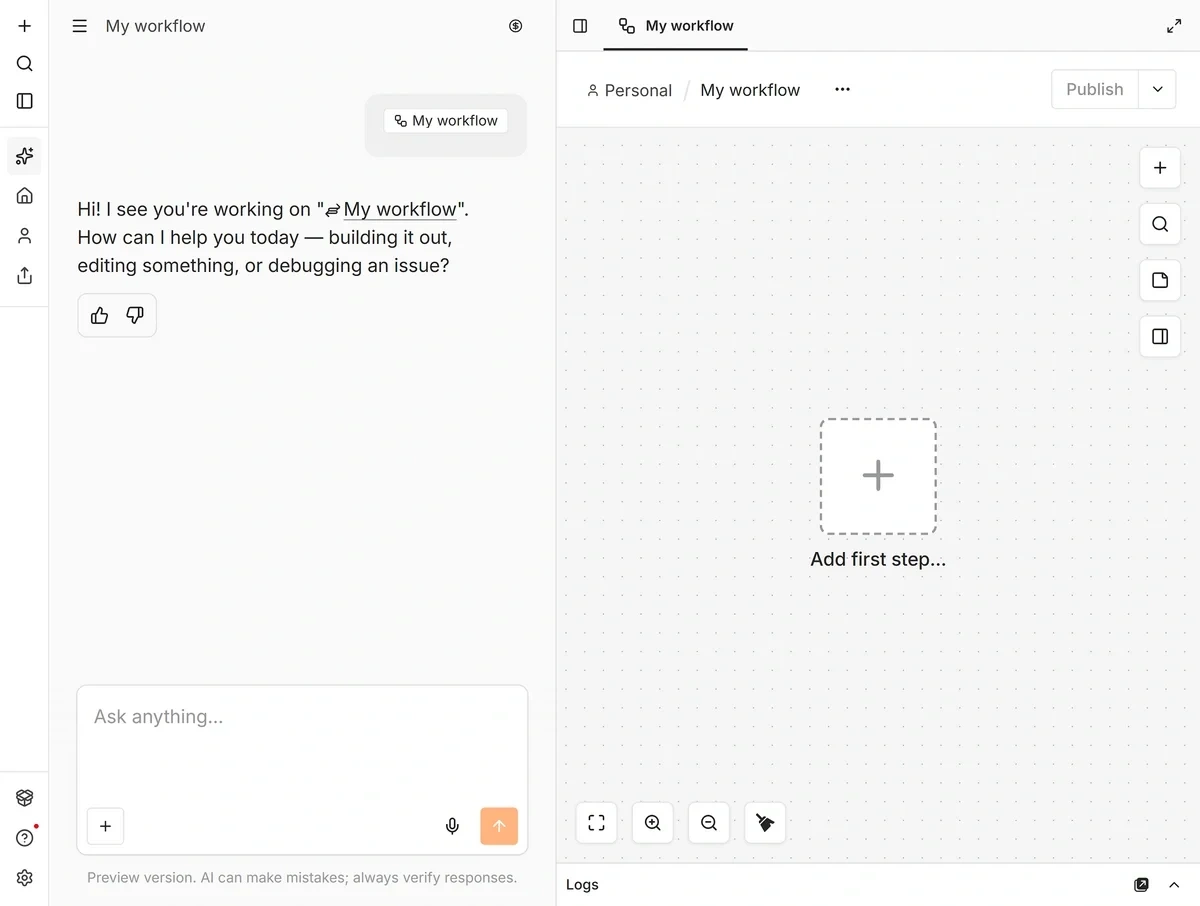
Keep in mind that you will always have to add your credentials for third-party tools like Exploding Topics, Semrush, and Slack yourself.
For this tutorial, I’m going to show you how to build your AI agent manually. That way you’ll have all the configuration details in case you need help troubleshooting or customizing your agent.
Step 1: Set Up Your Trend Validation Schedule
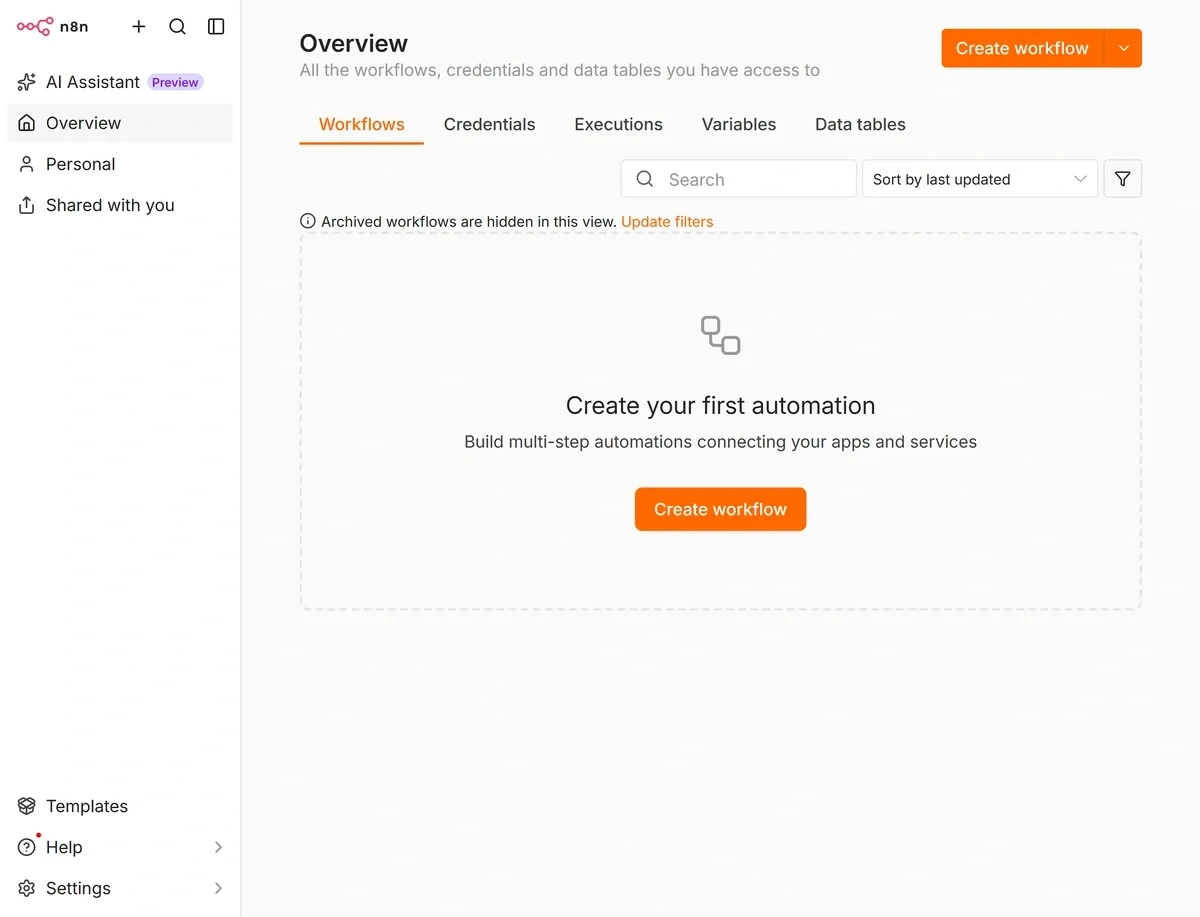
To start building your trend validation AI agent, open your n8n instance and click Create workflow.
Then click Add first step. Search for and select Schedule Trigger in the sidebar.
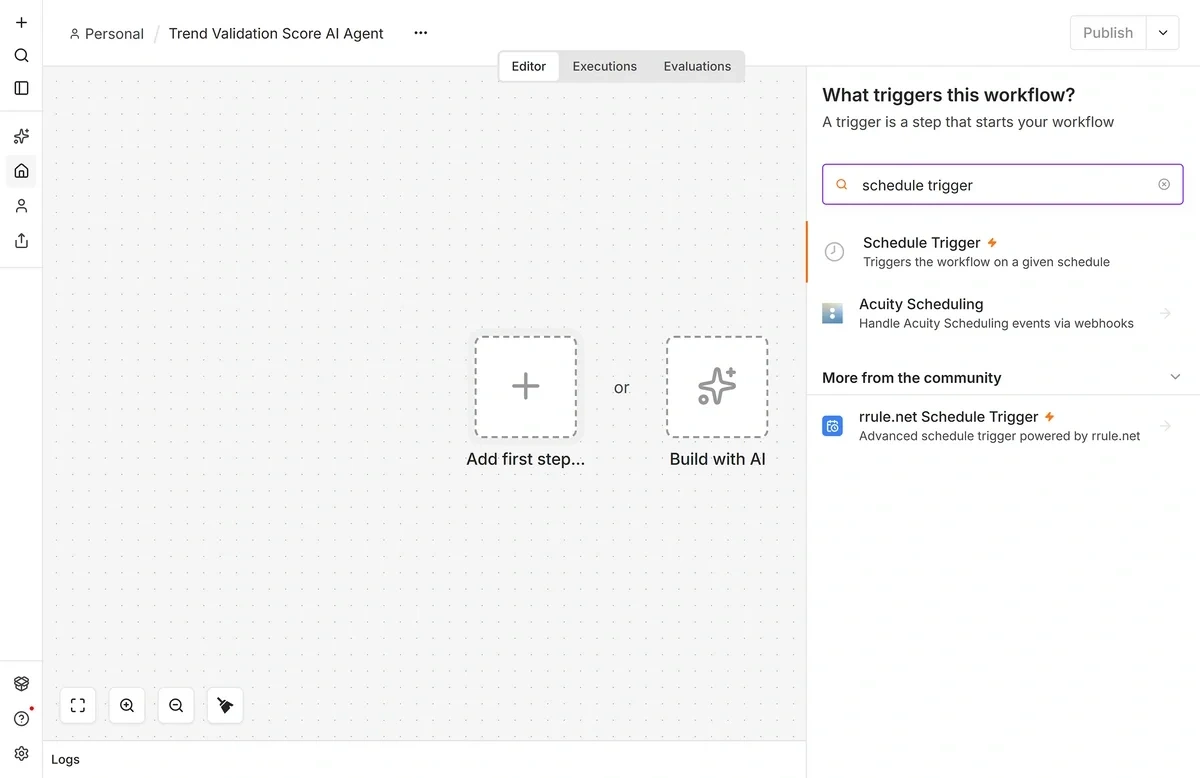
This sets your workflow up to run on an automated schedule so you receive new trend suggestions on a consistent basis. For my example, I’ve used the dropdowns in the node configuration window so the workflow runs every Tuesday at 10am.
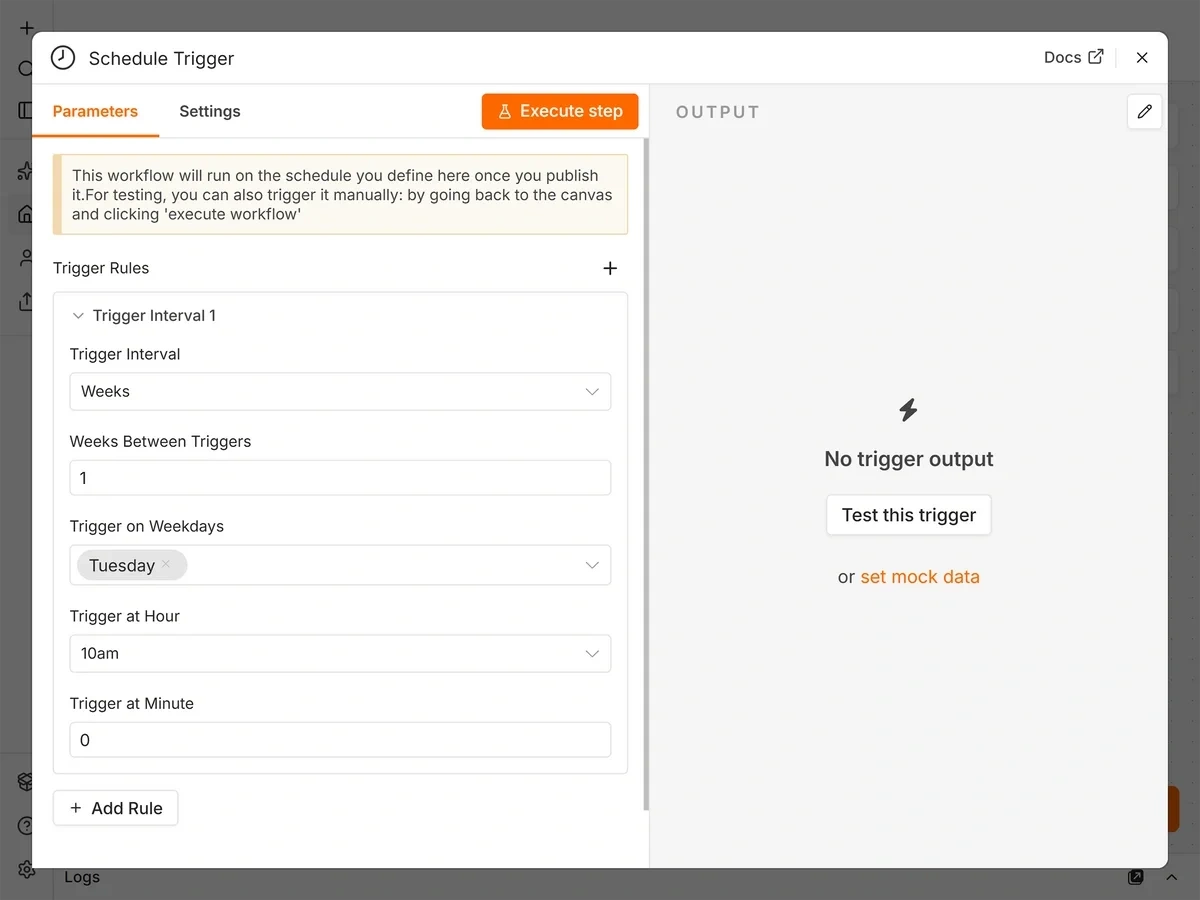
You can set yours to run more or less frequently depending on your needs.
Every time you configure a node in n8n, you will have the option to execute and test it. I recommend doing this, as it’s easier to troubleshoot issues along the way than to go back through your workflow and fix them later.
Test your schedule trigger, then close the configuration window once you receive a success message.
Step 2: Collect Trend Data from Exploding Topics
Next, you’ll need to configure your first data source for your AI agent: Exploding Topics.
Exploding Topics integrates with n8n using the HTTP Request node. Click the plus (+) sign to the right of your schedule trigger, then search for and select HTTP Request.
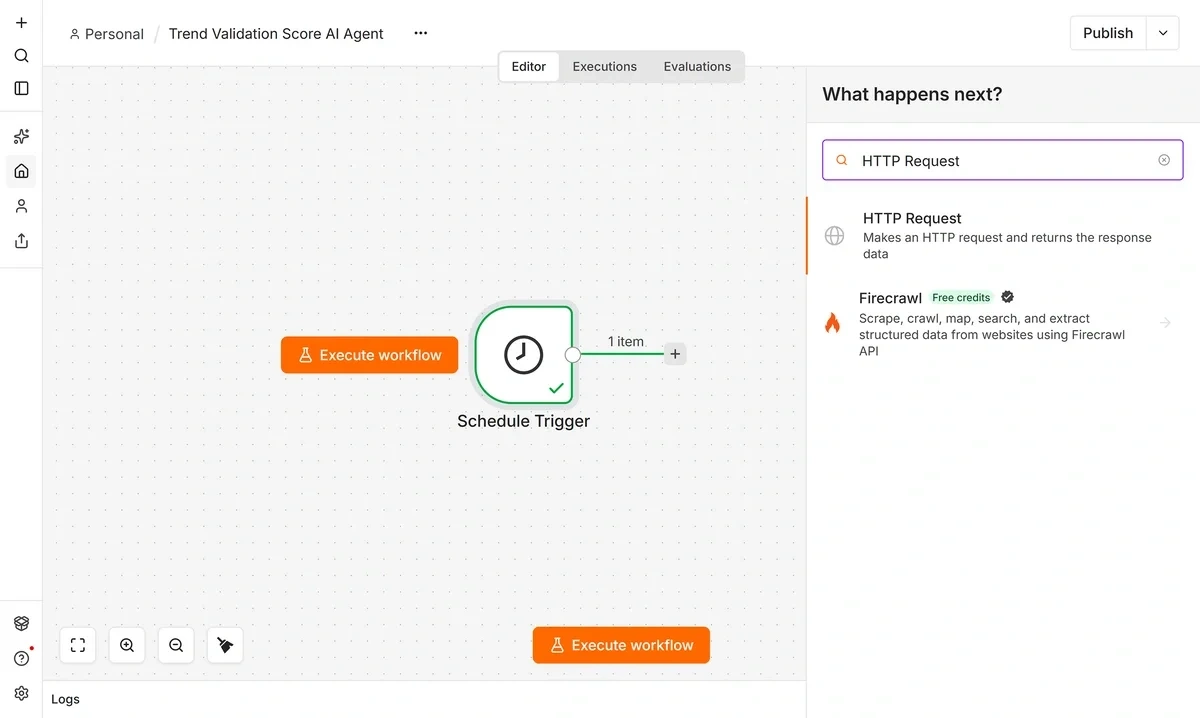
In the node configuration window, the Method dropdown should already be set to GET. Leave this option as-is.
The next field is for your API request URL. You can generate a request URL using Exploding Topics’ API documentation.
First, go to your Semrush account and open the Exploding Topics app. Navigate to API Access and copy your API key.
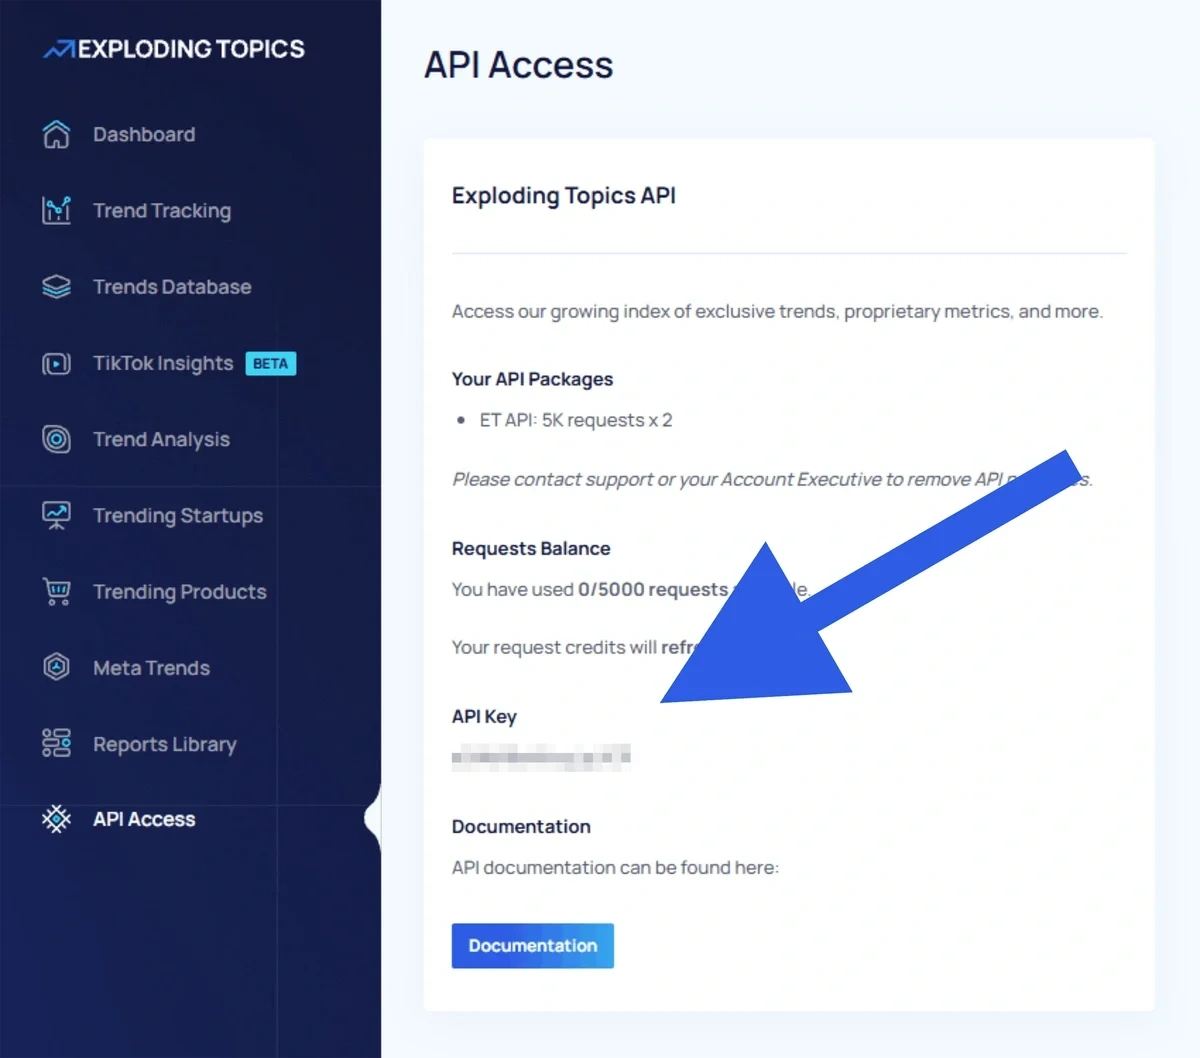
Then go to Exploding Topics’ API documentation. Click Authorize and paste your API key into the window that appears.
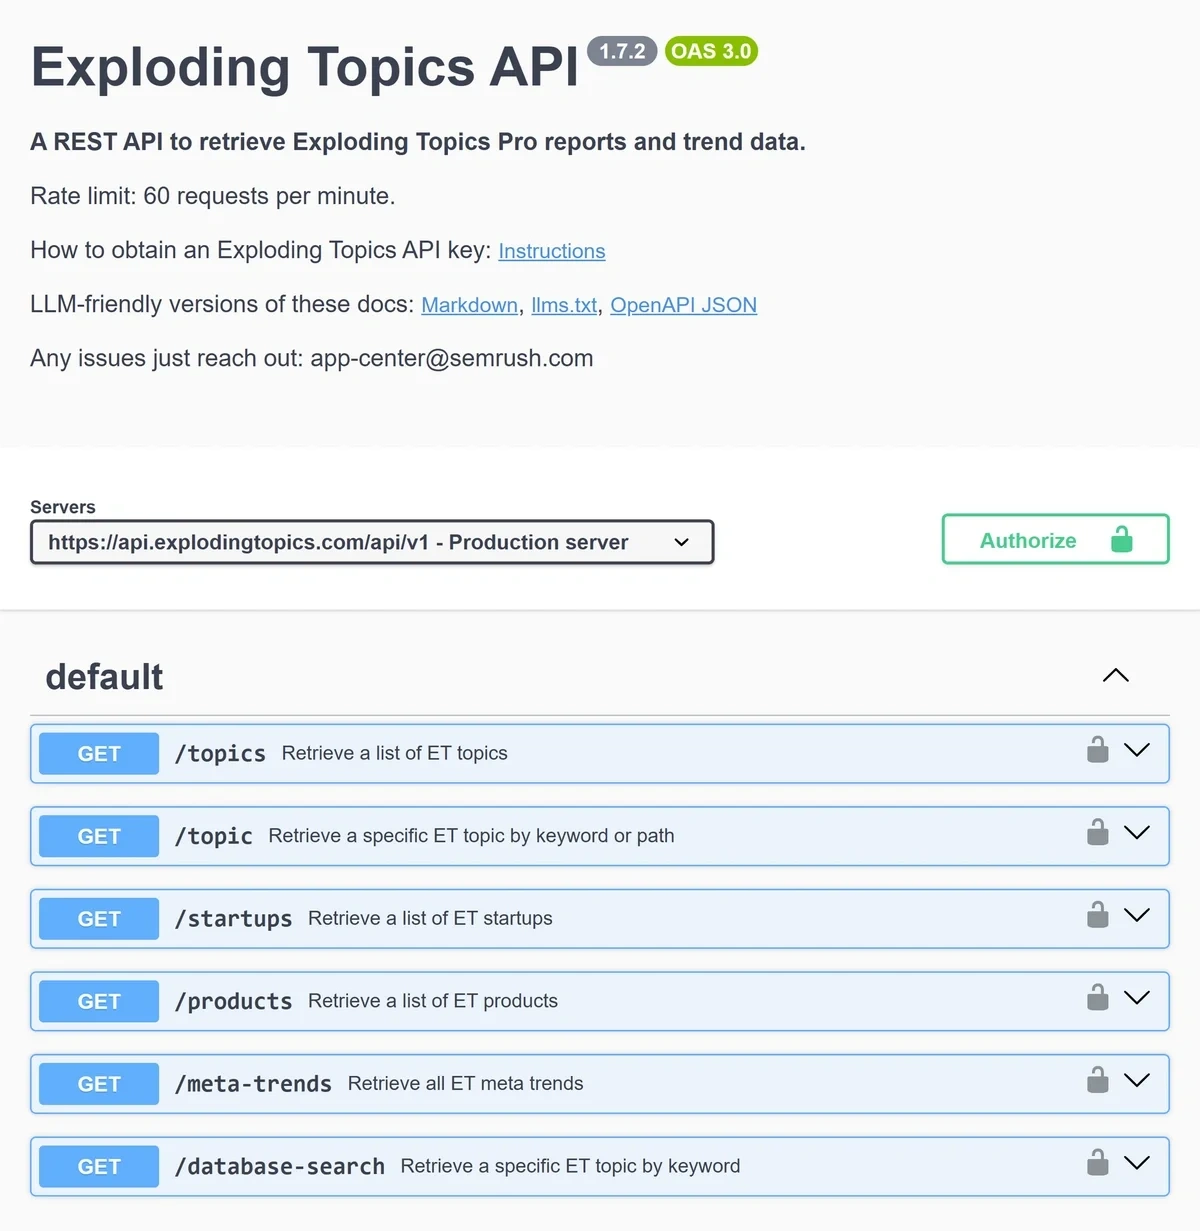
You can use any of the API methods for your trend validation AI agent. The best option depends on your brand and your goals. For my example, I’m going to use GET /topics.
Expand the method you want to use, then click Try it out.
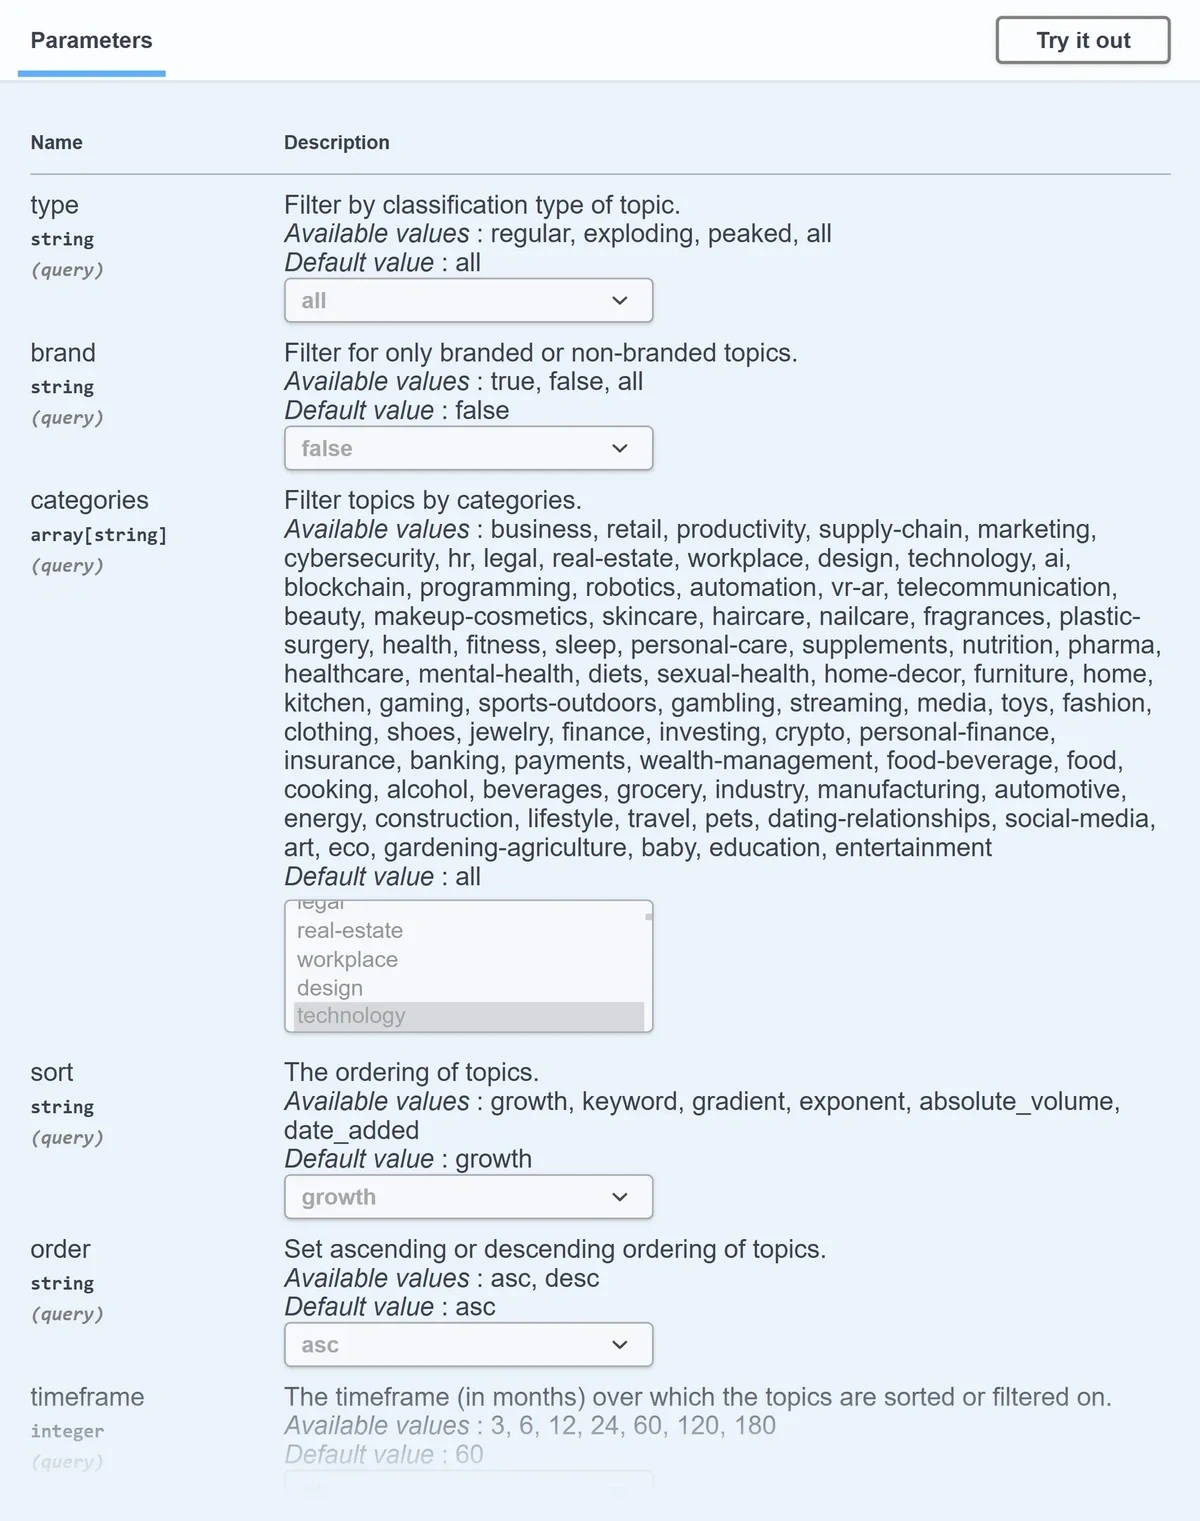
Set the API request parameters using the dropdowns. I’ve set mine as follows:
- type: exploding
- brand: false
- categories: cybersecurity
- sort: growth
- order: asc
- timeframe: 12
- offset: 0
- limit: 10
- Response_timeframe: all
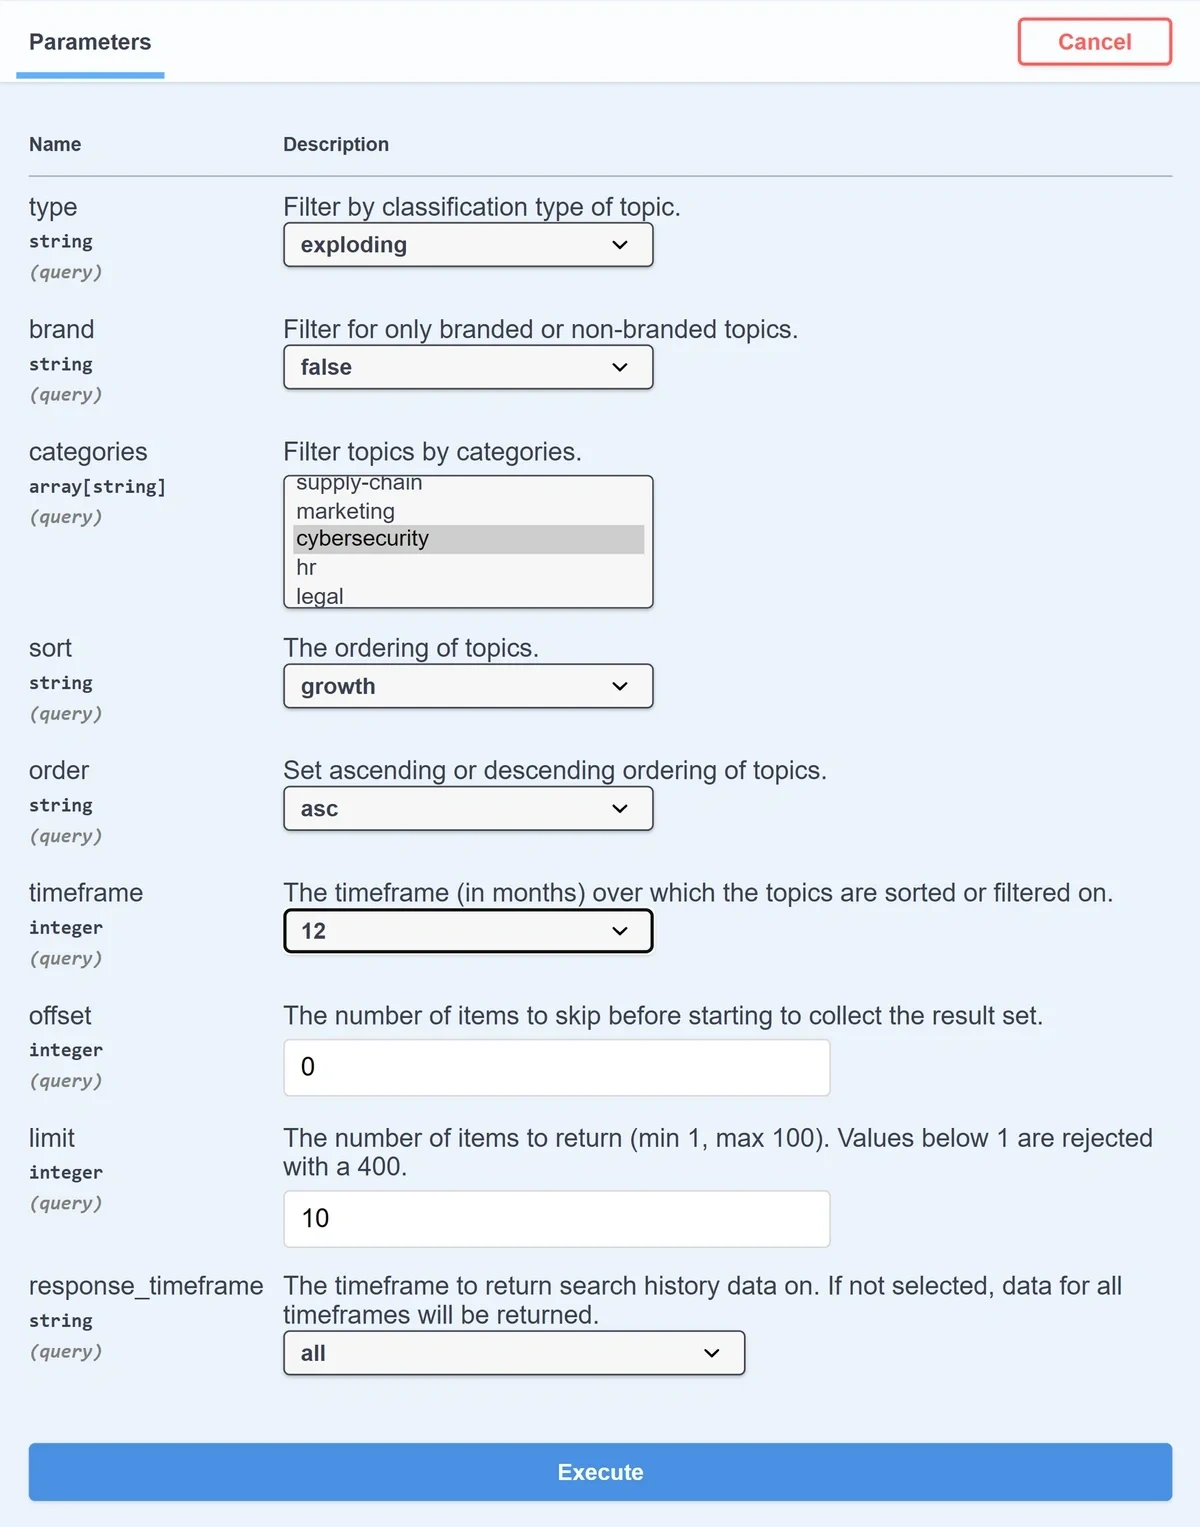
I want to draw particular attention to the limit parameter. This determines how many trends Exploding Topics brings into your workflow. It impacts how many API requests your workflow makes to Semrush in Step 4 of this tutorial, and can also affect your workflow runtime and OpenAI credit use.
For these reasons, I recommend keeping this number on the smaller side rather than trying to validate dozens or hundreds of trends every time your workflow runs.
Once you’re happy with your parameters, click Execute.
Under Responses, copy the Request URL.
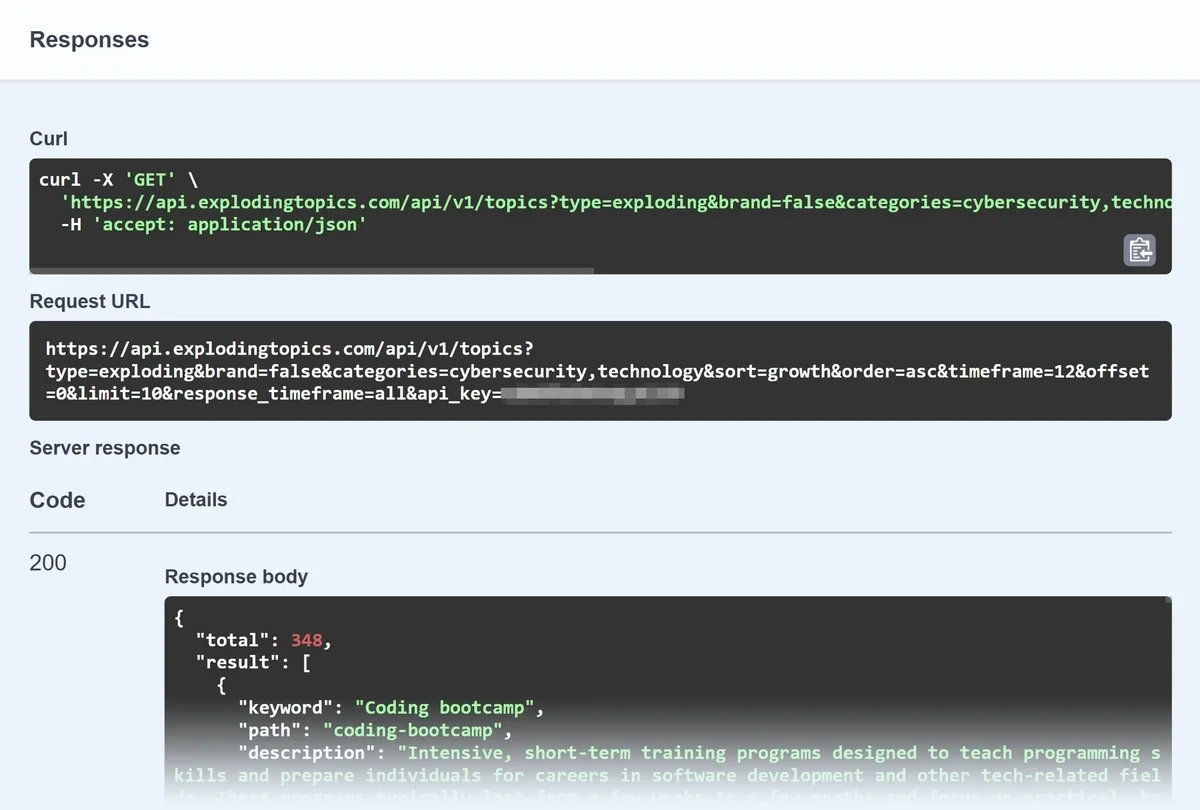
Paste this into the HTTP Request node configuration window in n8n.
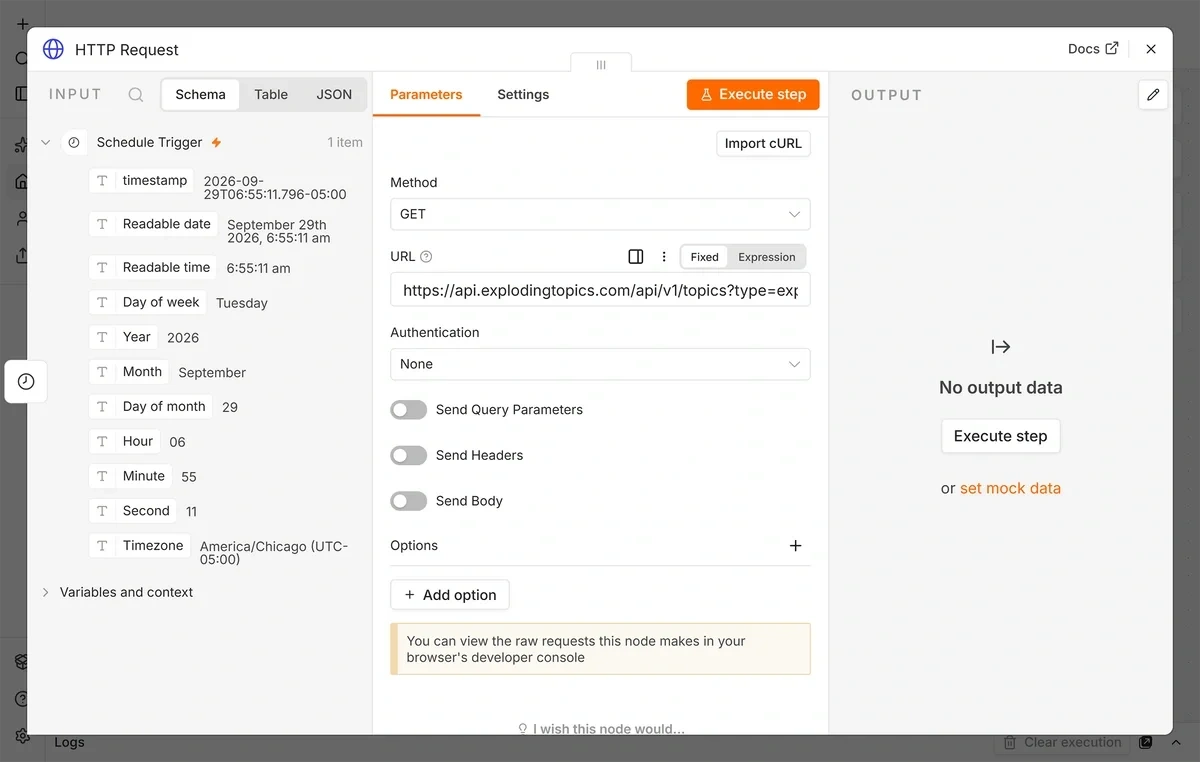
Leave the Authentication dropdown set to None.
Set the API Response Format
Before you move on, there’s another step you need to take in the HTTP Request configuration window.
The Exploding Topics API returns responses in JSON, but when left to its default settings, n8n will sometimes change the format of the response. This makes the response data unusable in later steps in the workflow.
To make sure the HTTP Request node always returns properly formatted JSON as the response, click the Add Option button and select Response.
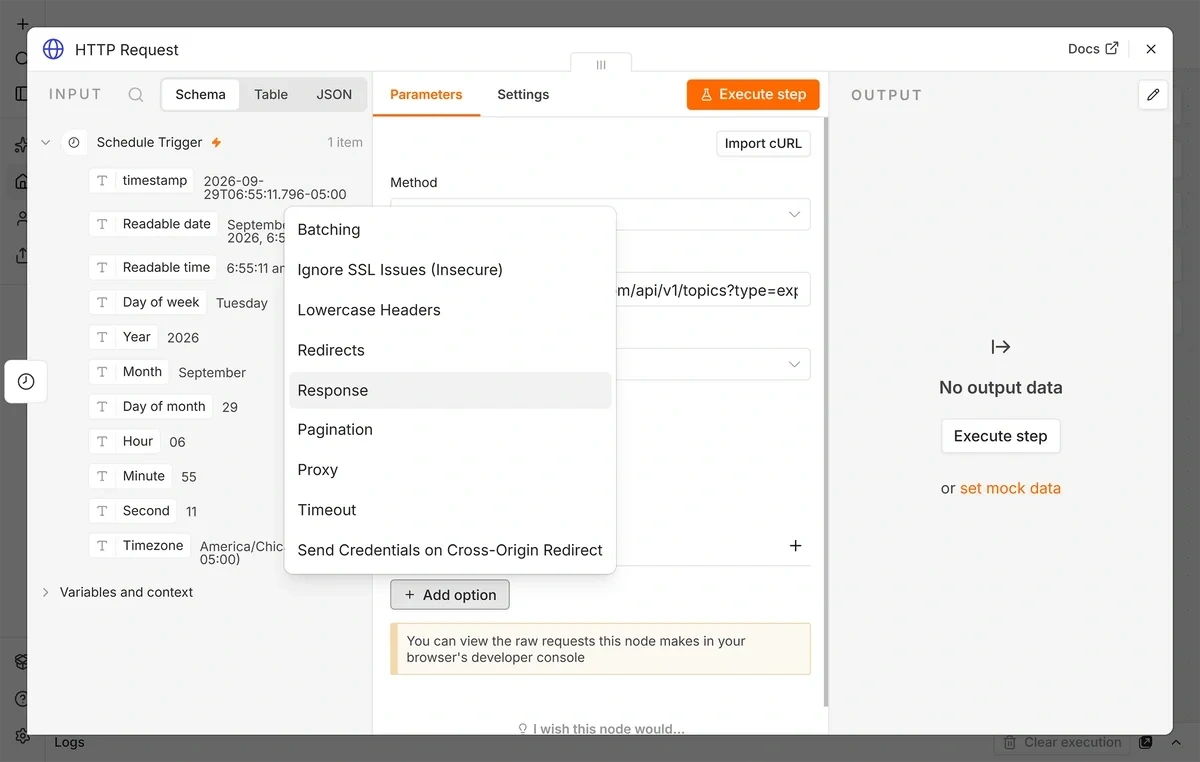
Then set the Response Format dropdown to JSON.
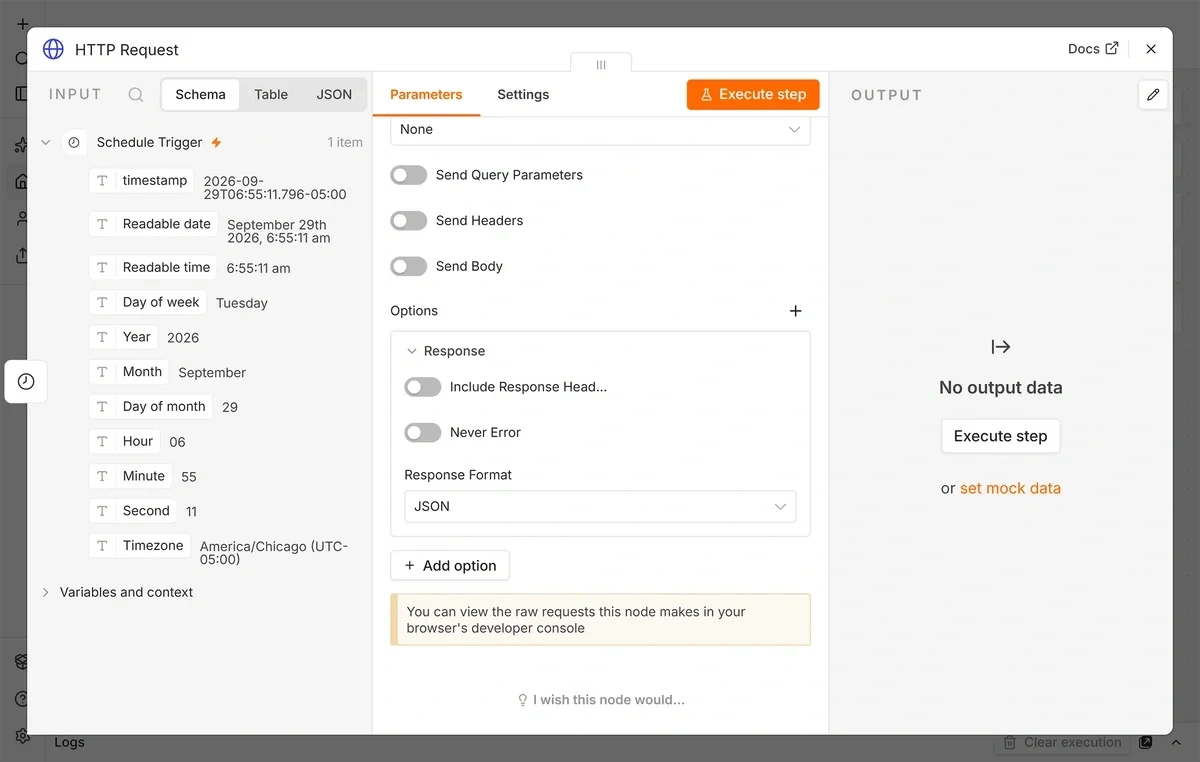
Don’t forget to test your HTTP Request node and make sure the output looks correct.
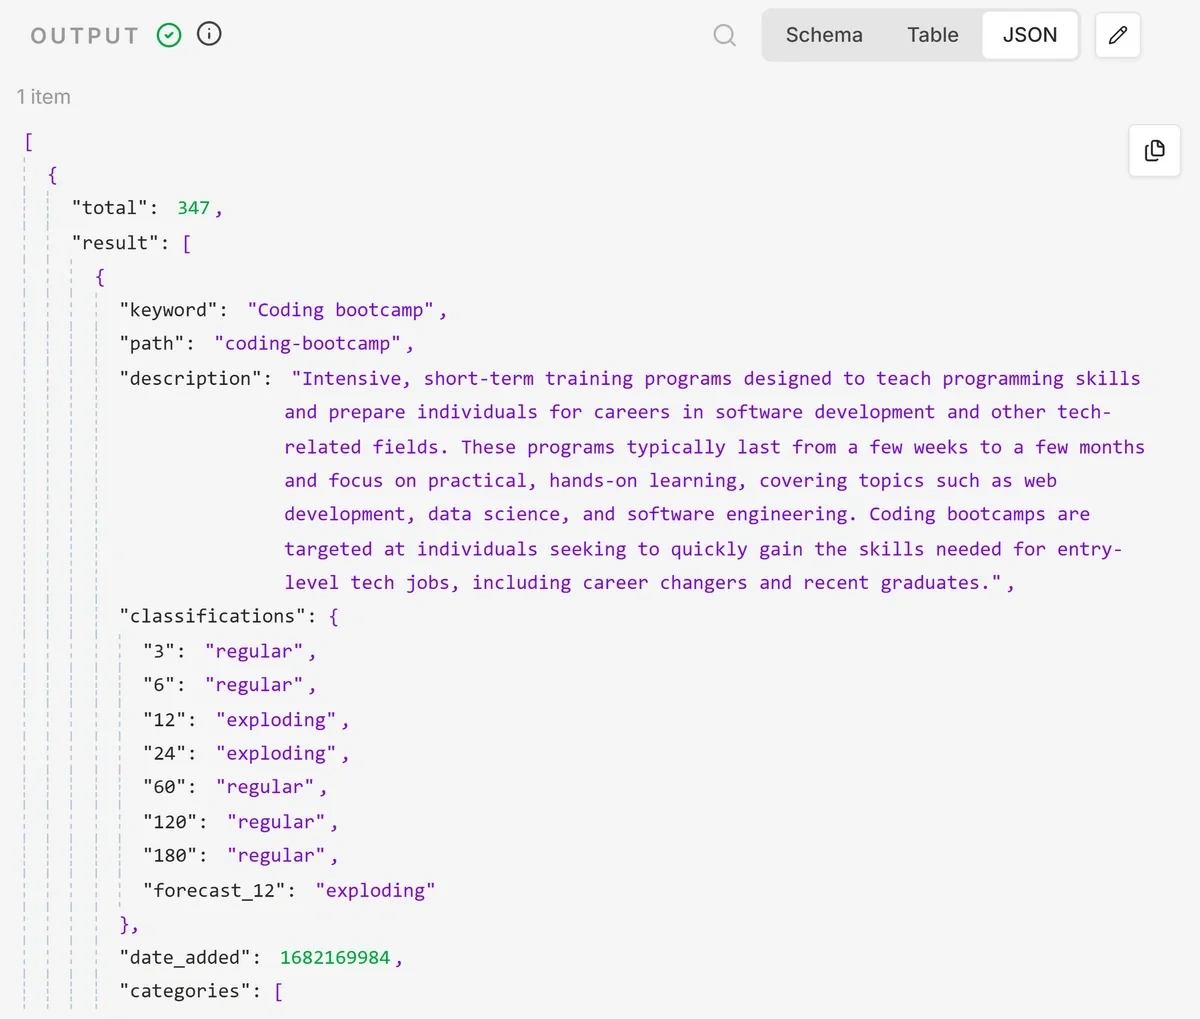
Then close the node configuration window.
Step 3: Split Out Your Exploding Topics Results
If you look at the top of the output for your Exploding Topics HTTP Request node, you’ll see it says “1 item.”
This is because the response is returned as a single JSON object (just like we specified when we set the response format).
Because we want to generate a trend validation score for each of the topics retrieved from Exploding Topics, before we can do anything with this data we first have to split the object into separate items for each topic. For my example, this is 10 items, the number I set for the limit parameter when creating my API request URL.
To accomplish this, I’ll use the n8n Split Out node. I’m going to add two of them, because we’re going to use the data from Exploding Topics twice.
Click the plus (+) icon and search for and select Split Out to add your nodes.
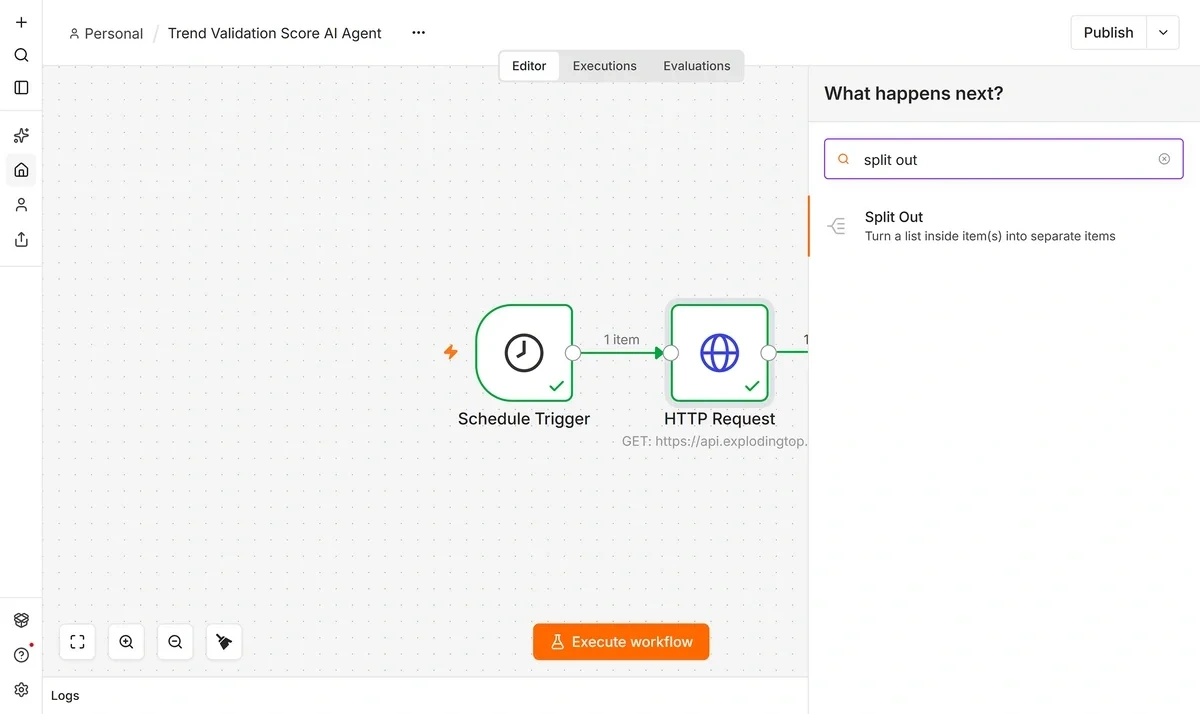
Connect them to your Exploding Topics HTTP Request node so they appear like so.
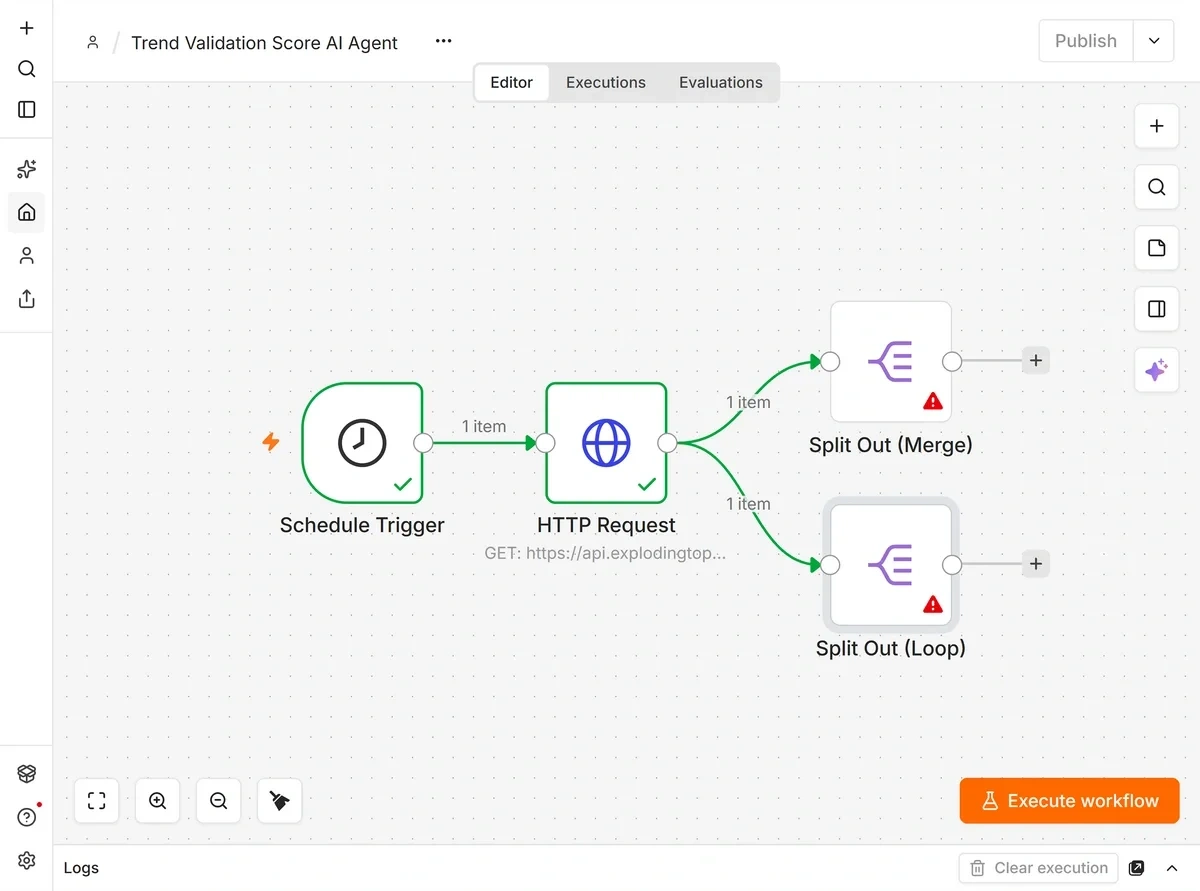
I’ve labeled the nodes “Split Out (Loop)” and “Split Out (Merge)” because those are the actions we’re going to use the data for. You’ll configure the two nodes the exact same way.
In the node configuration window, type or drag and drop “result” into the Fields To Split Out field.
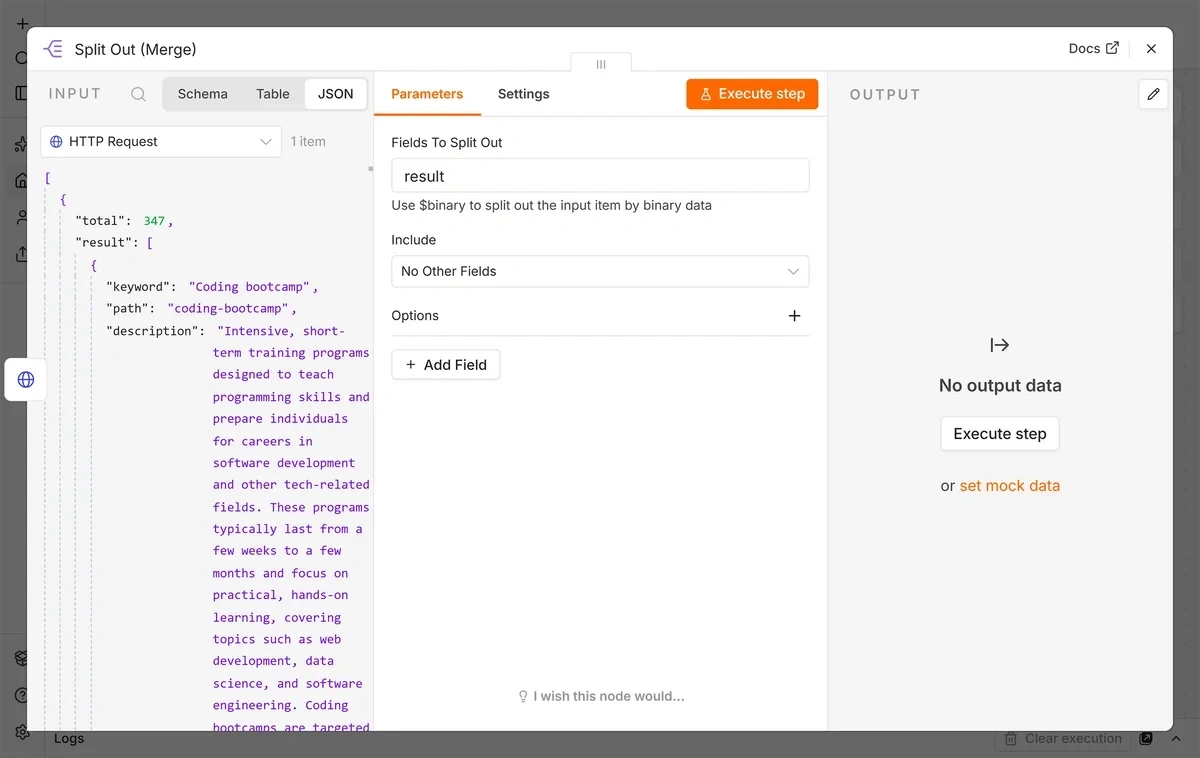
Leave the Include dropdown set to No Other Fields. Then execute the step to test it.
The output should now show “10 items” (or however many you set your API parameter to retrieve from Exploding Topics).
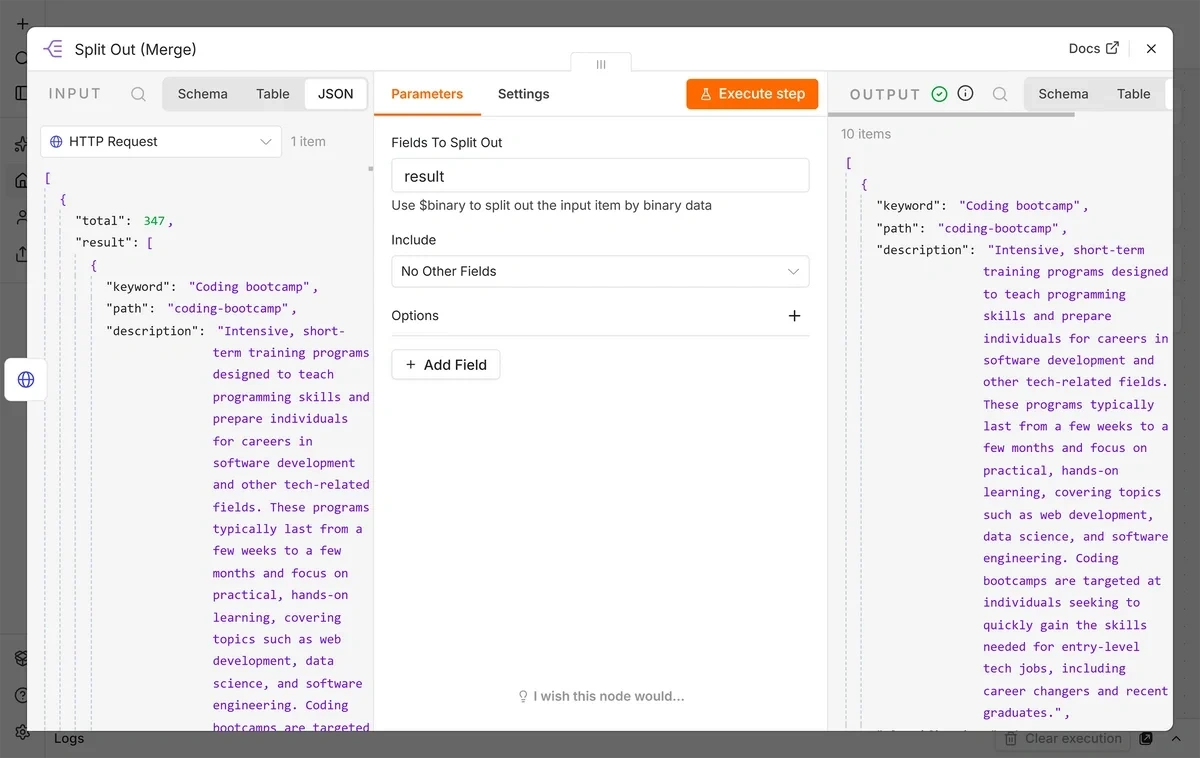
Close the configuration window. In the next step, we’ll work off of the Split Out (Loop) branch.
Step 4: Retrieve Semrush Keyword Data
In addition to trend data from Exploding Topics, our trend validation scoring system is going to use keyword data from Semrush. In order to provide this information to the AI agent, we need to retrieve the keyword volume and keyword difficulty for each trend pulled from Exploding Topics.
When you want to repeat the same action for each item in a set of items in n8n, you use the Loop Over Items node.
Click the plus (+) icon, then search for and select Loop Over Items.
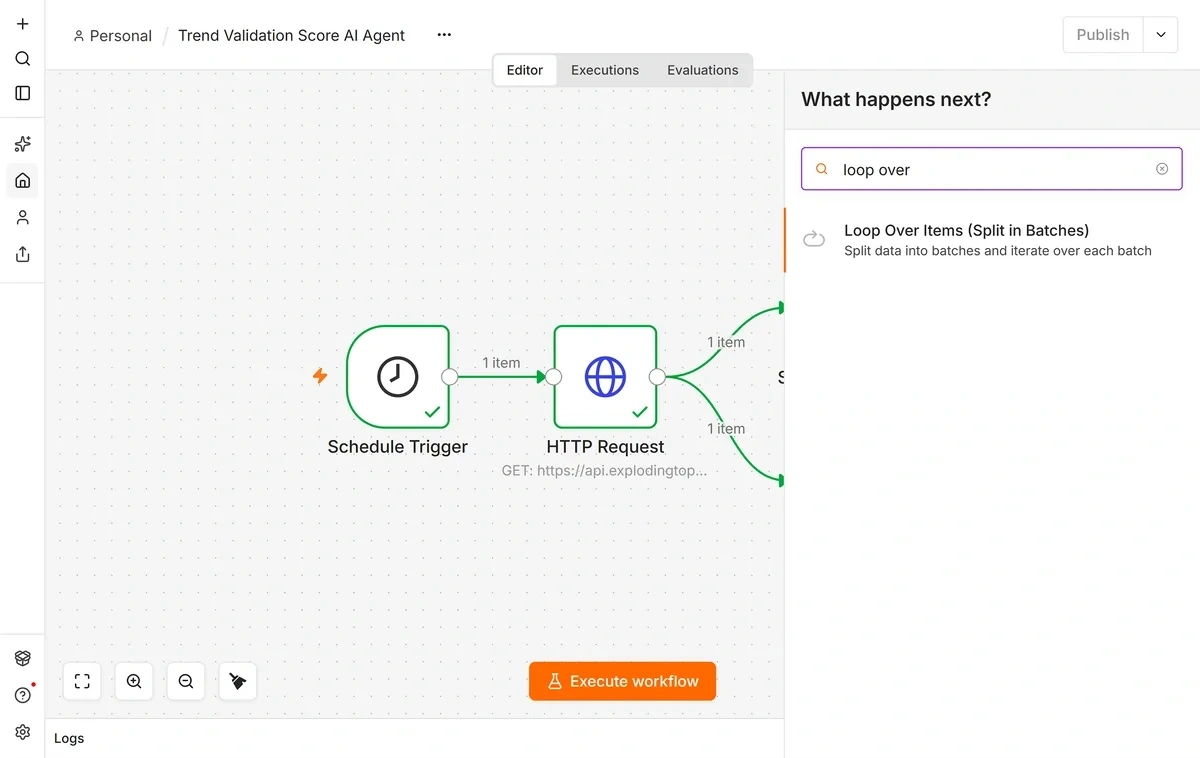
There’s no configuration needed for the Loop Over Items node, so you can close the configuration window.
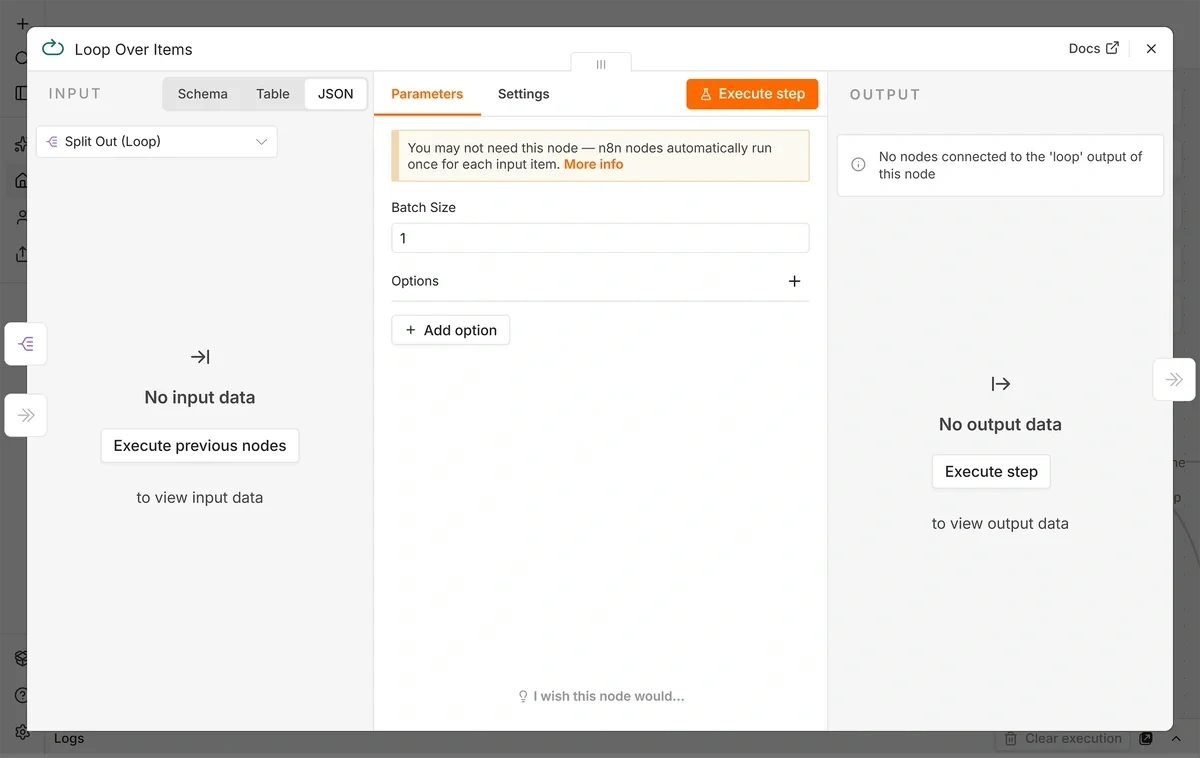
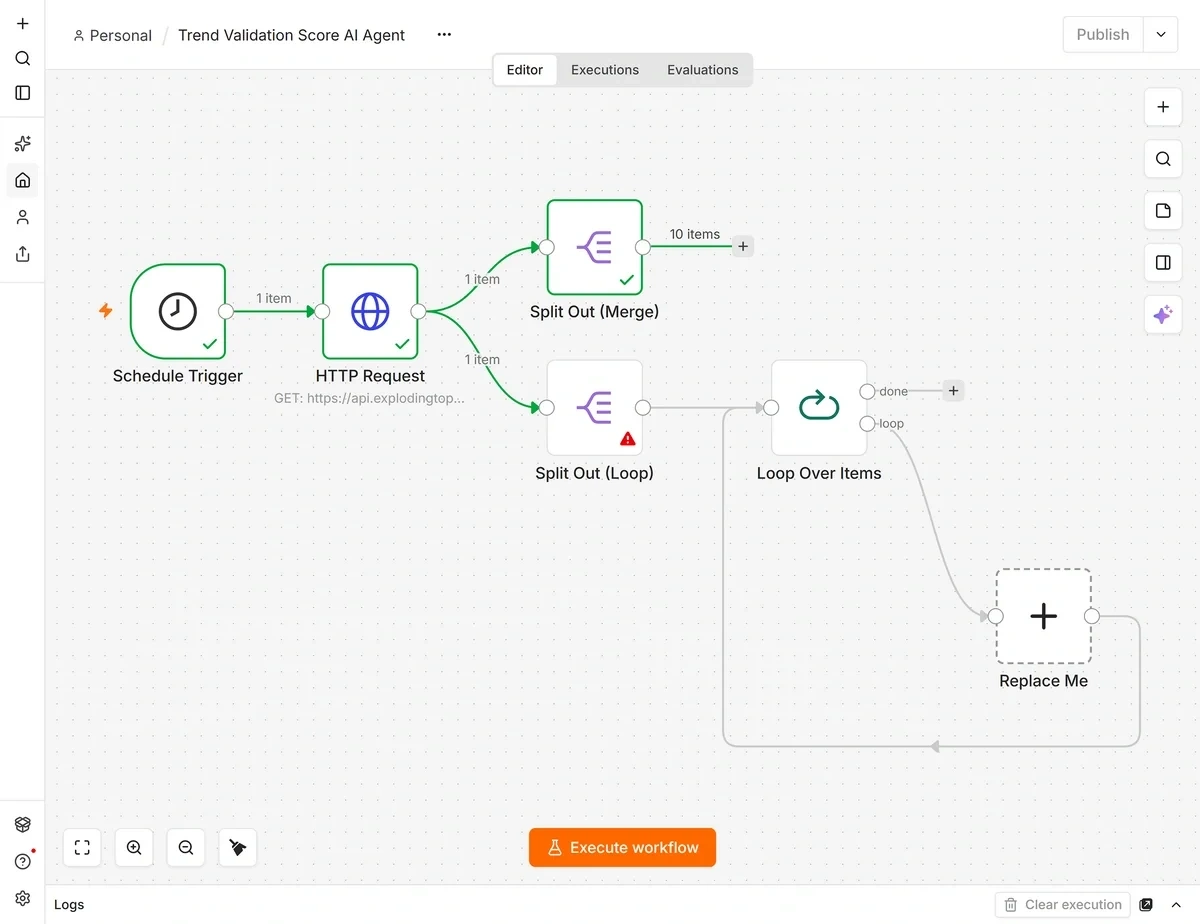
Click on the square labeled Replace Me that appears in the loop and add another HTTP Request node.
This is where your Semrush API request will go. You’ll need your Semrush API key to construct the request. You can find it by going to the API Keys page in your account.
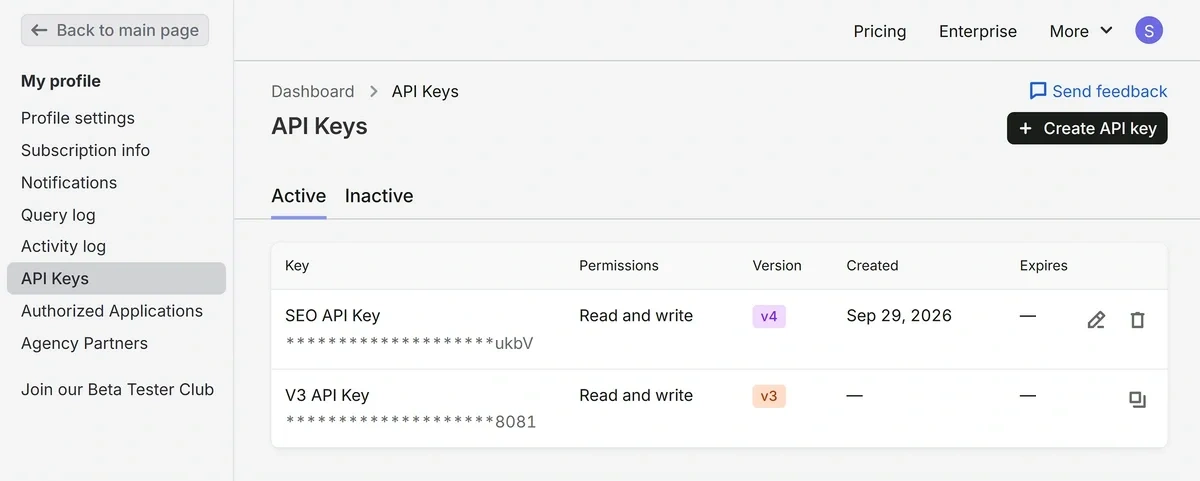
You will need a v4 API key to retrieve the data we’ll use in this workflow. If you don’t already have one, create one and copy it to a secure location (you won’t be able to access it again).
Back in the configuration window for your HTTP Request node, click on the Import curl button.
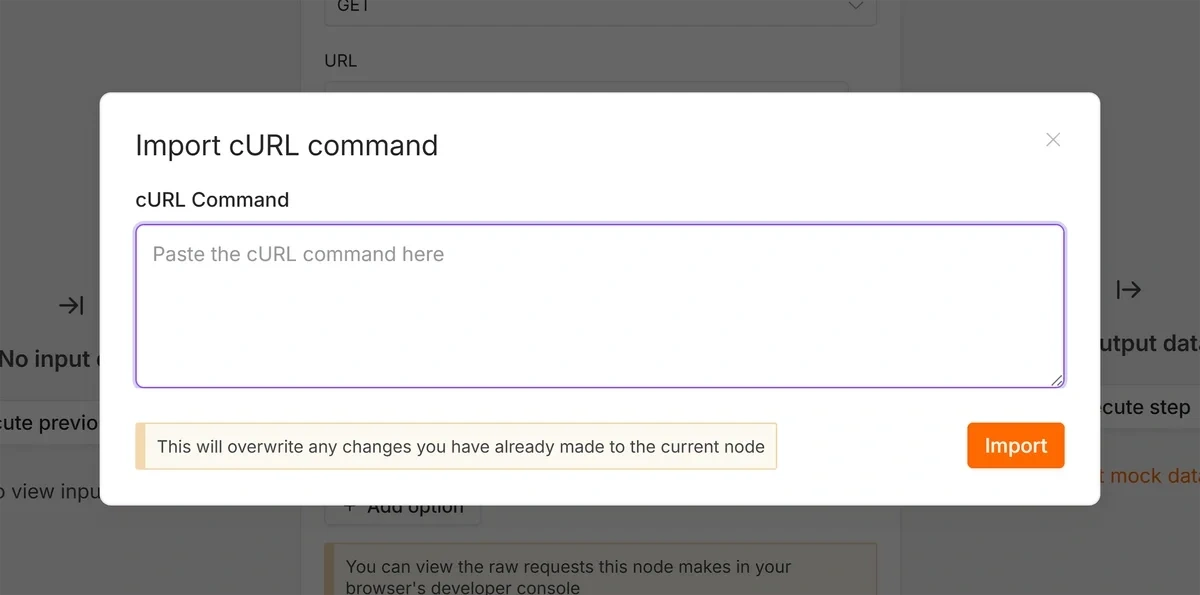
Paste the following keyword report request into the curl Command window and click Import. Make sure to replace YOUR_API_KEY with your API key.
curl -H 'Authorization: Apikey YOUR_API_KEY' "https://api.semrush.com/apis/v4/keywords/v1/metrics?keyword=seo%20tools&country=US"
This will fill in the fields you need for the HTTP Request node. There is one important change you need to make, though.
First, expand the Keyword parameter and replace the value by dragging and dropping keyword from the input into the field.
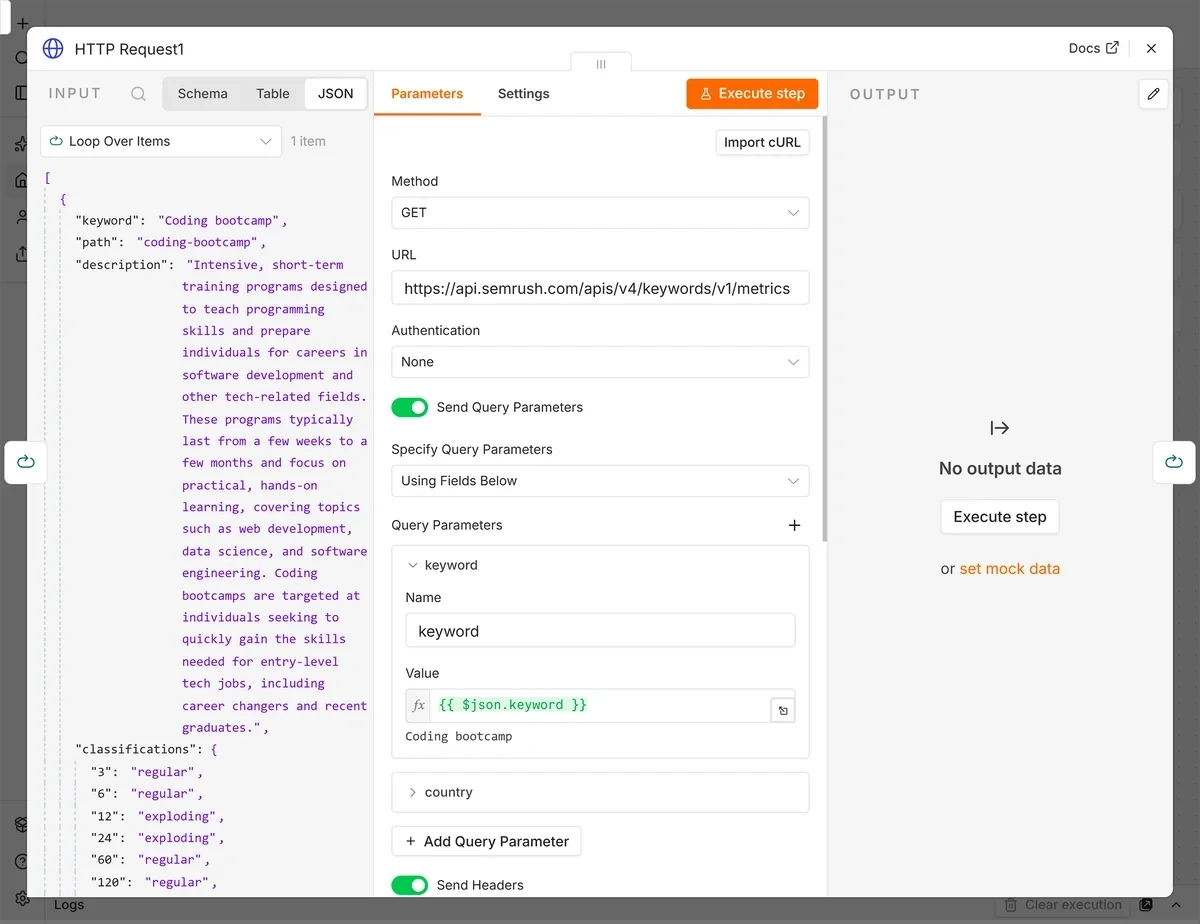
You can also type {{ $json.keyword }} into the field if you prefer.
This will use a topic from the Exploding Topics API response as the keyword parameter in the API request to Semrush.
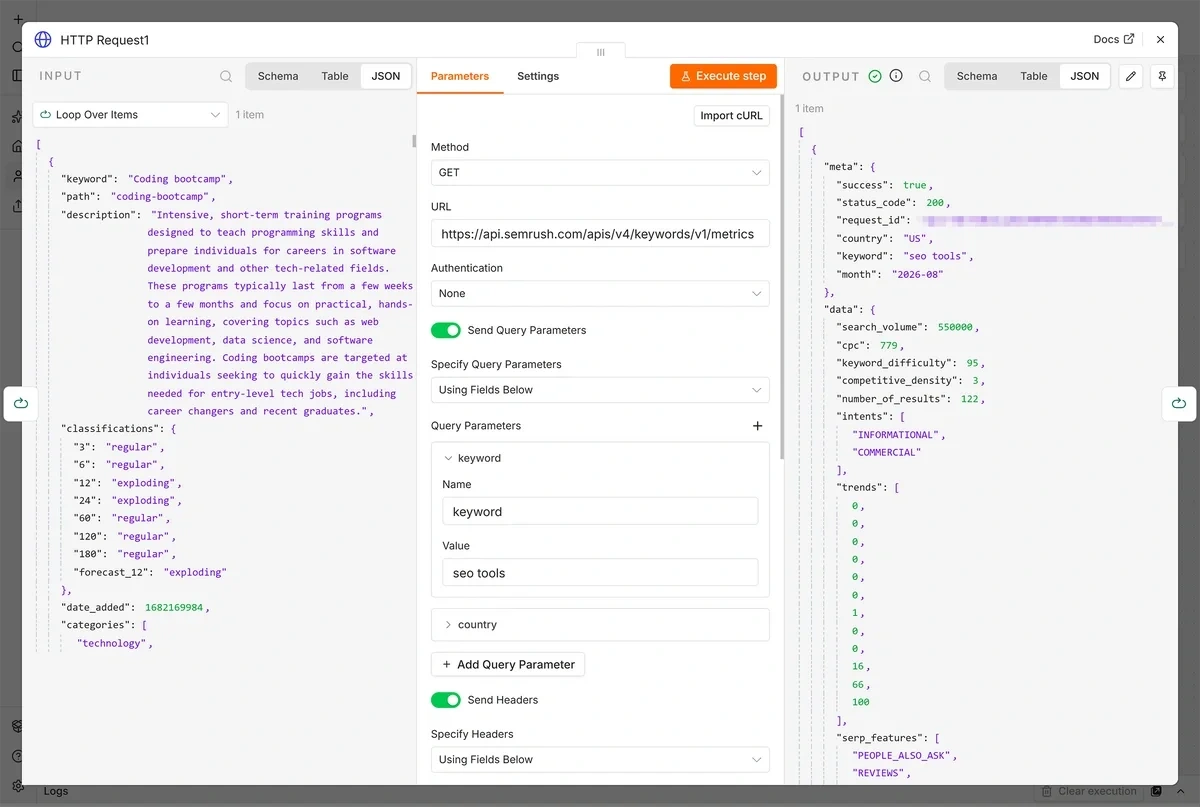
Before you test your node, make sure to add an option and set the response format to JSON just like we did with the first HTTP Request node.
Your test output should look something like this:
Build a winning strategy
Get a complete view of your competitors to anticipate trends and lead your market
Step 5: Merge Exploding Topics and Semrush Data
Now you have data from Exploding Topics and data from Semrush for 10 trending topics. The next step is to put them together so your AI agent can read them and generate a trend validation score for each topic.
Back in the workflow builder, click on the plus (+) icon to add a new node branching off of the Split Out (Merge) node from Step 4. Search for and select the Merge node.
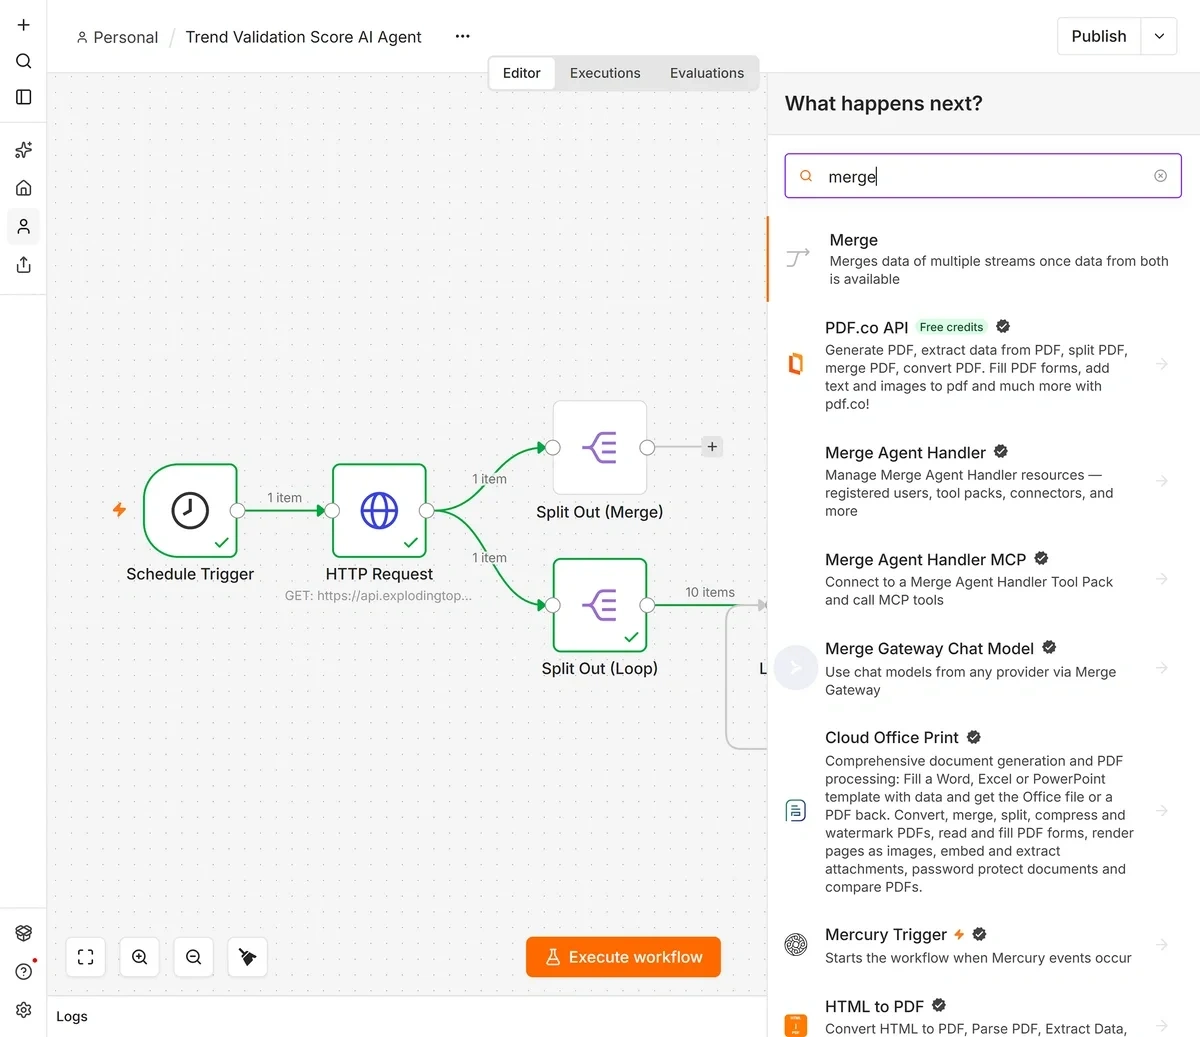
Merge nodes require two inputs. Set Split Out (Merge) as Input One and the done path from your Loop Over Items node as Input 2. Your workflow should look like this:
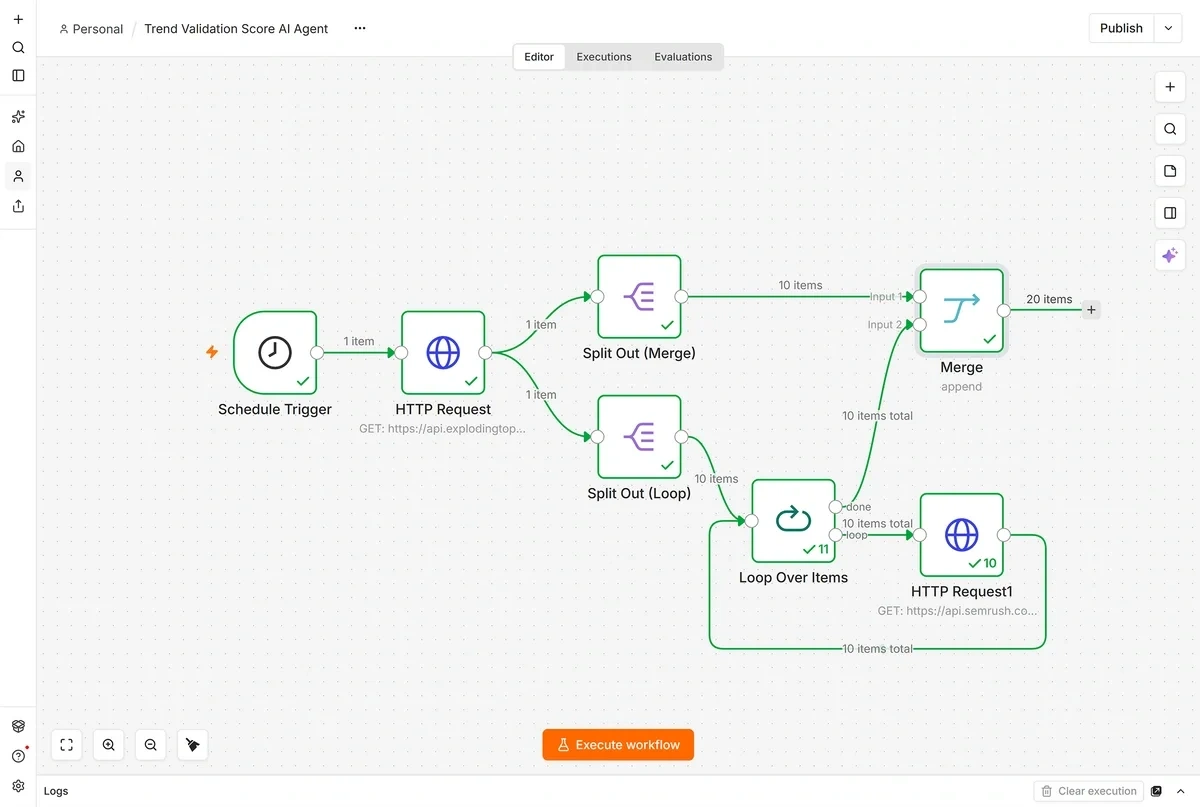
Open the configuration window for the Merge node.
We’ve provided two lists of 10 items to the Merge node. The node is going to combine the two lists into one list by matching the first item from List 1 with the first item from List 2, the second item from List 1 with the second item from List 2, and so on.
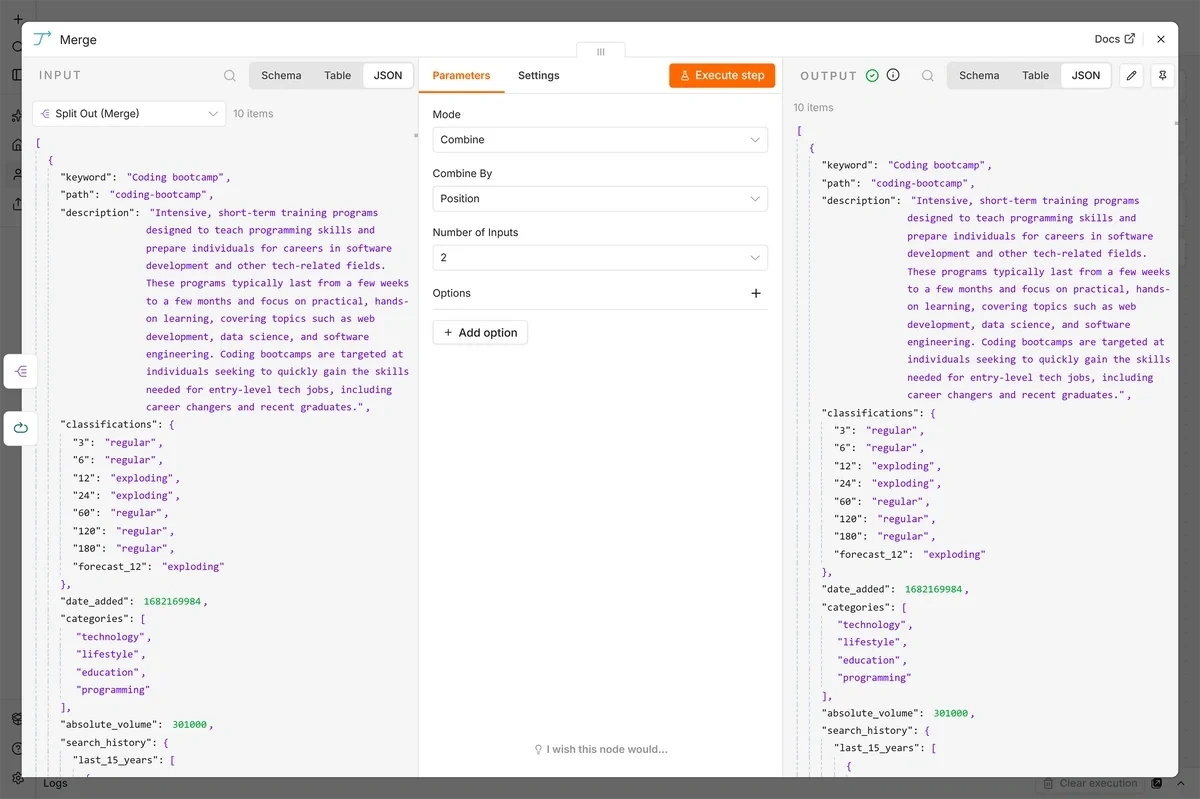
In the configuration window, this looks like setting the Mode dropdown to Combine and the Combine by dropdown to Position.
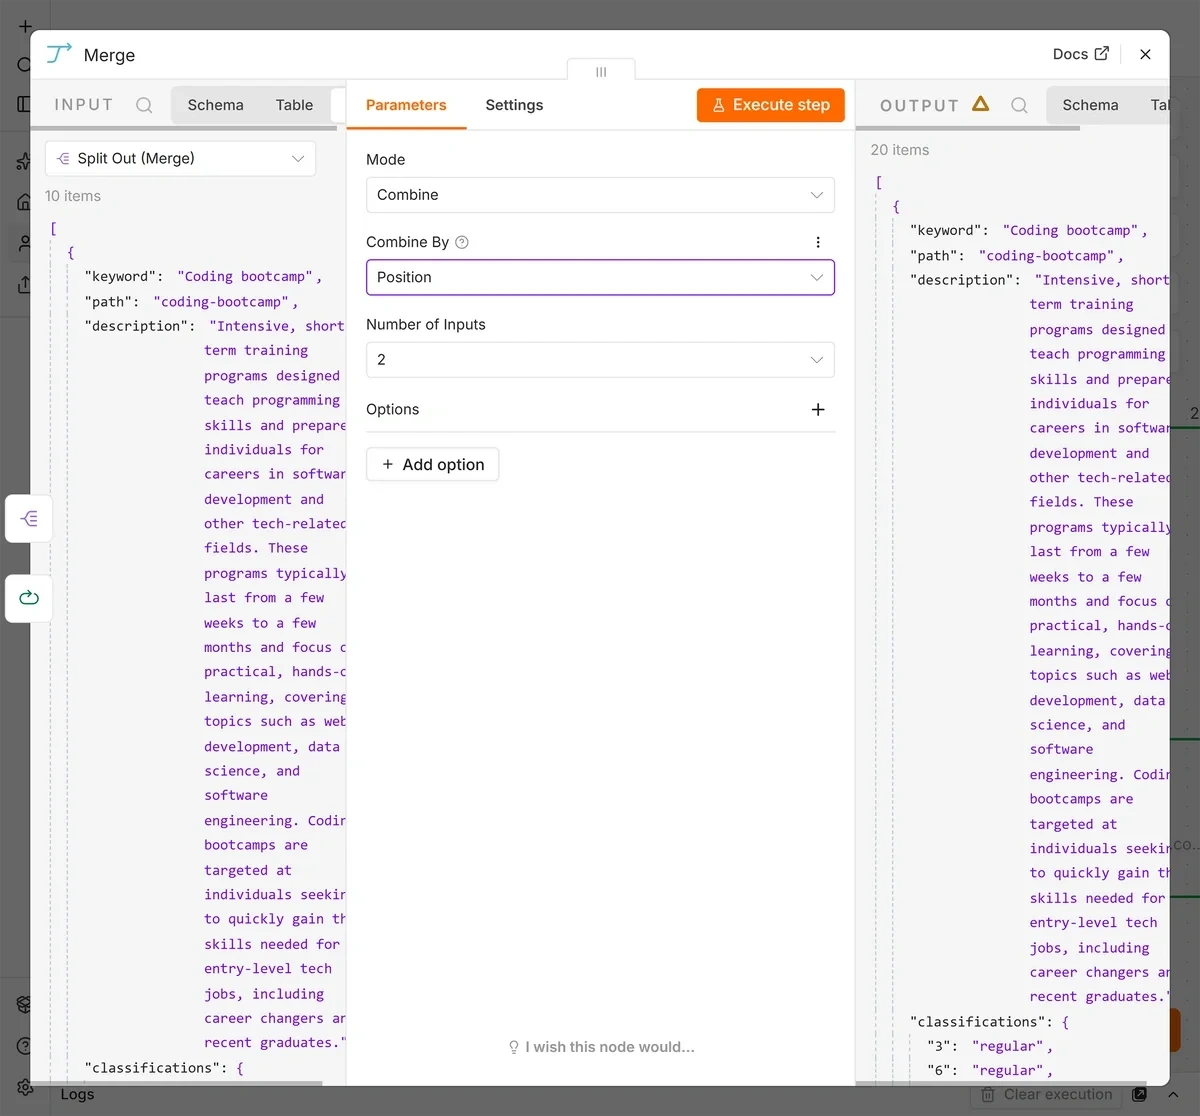
When you test the step, you should see “10 items” listed at the top of the output. If you scroll through the JSON, you’ll see that for each keyword you have all the data from Exploding Topics and all the data from Semrush for that term wrapped in curly braces.
Step 6: Build Your Trend Validation AI Agent
We’ve finally reached the portion of the tutorial where you get to build your trend validation AI agent.
Click the plus (+) icon again, then click on AI and select the AI Agent node.
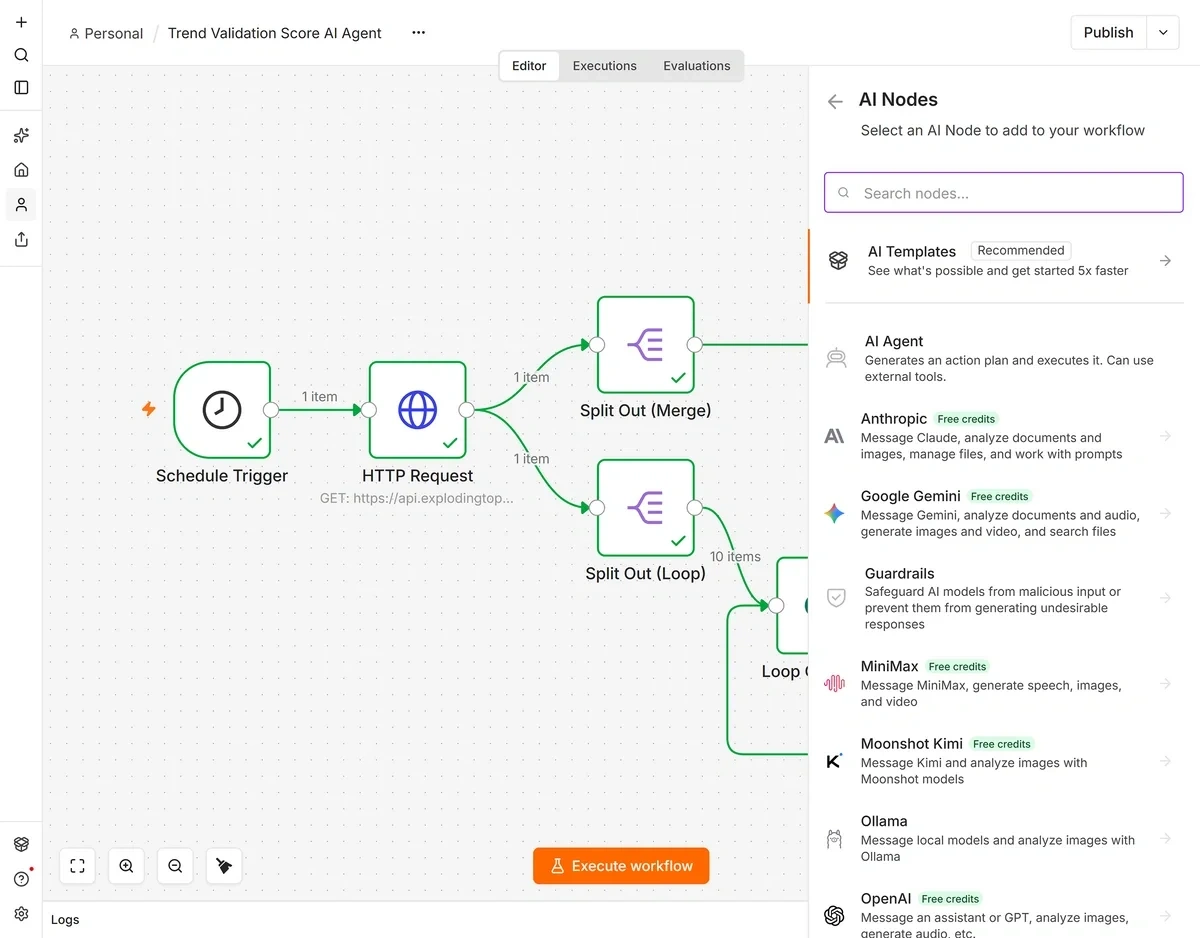
At the bottom of the node configuration window, click on Chat Model.
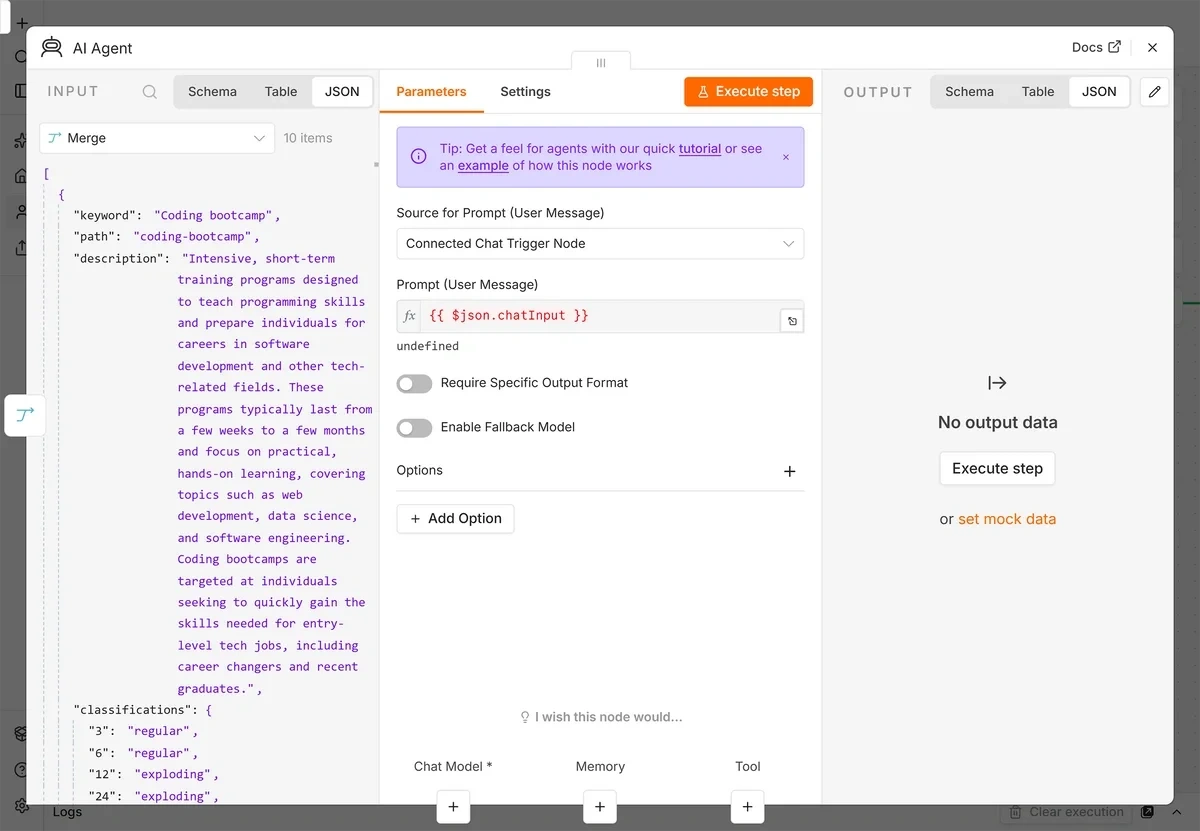
There are several options you can choose from here. I’ve opted to use OpenAI for this tutorial, but you can select whichever model you prefer.
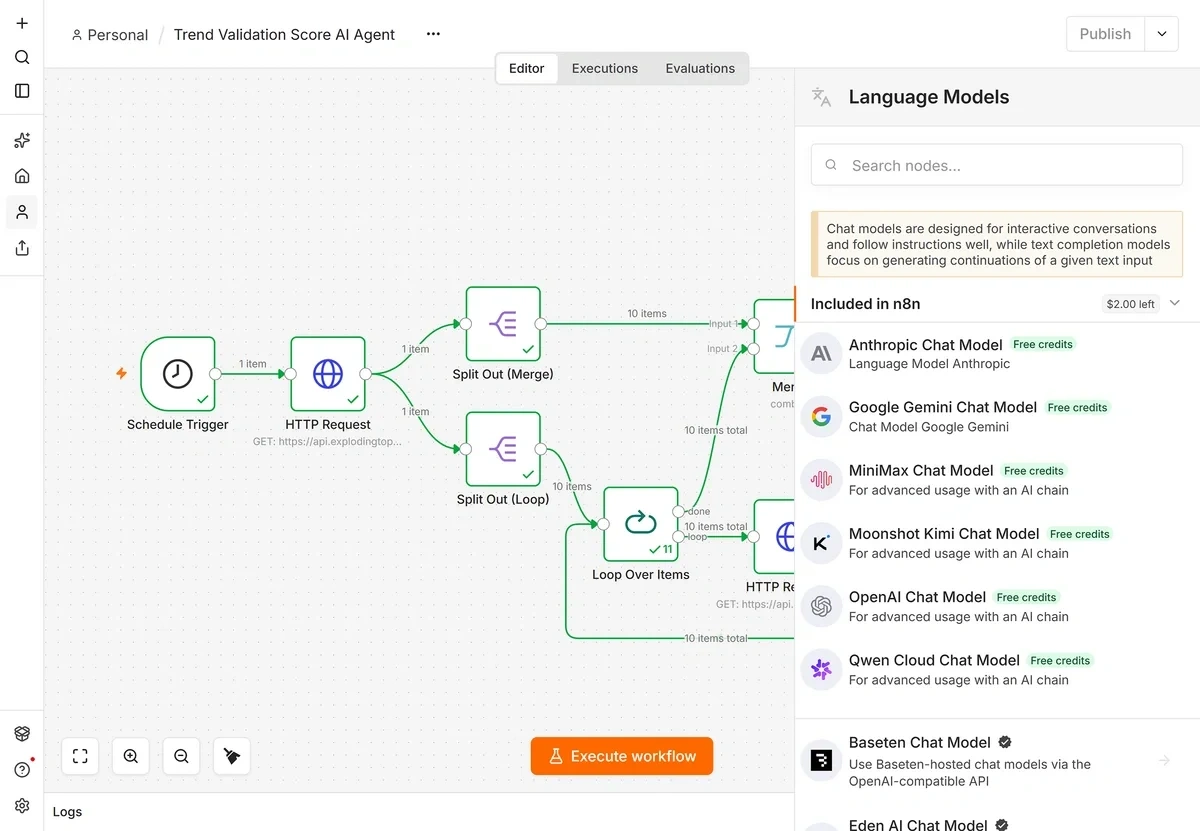
n8n provides 2,300 AI credits per month with its Starter plan. Keep in mind that depending how often you run your trend validation AI agent and how many trends you analyze each time, you may need to purchase additional credits.
Back in the AI Agent node configuration window, change the Source for Prompt dropdown to Define below.
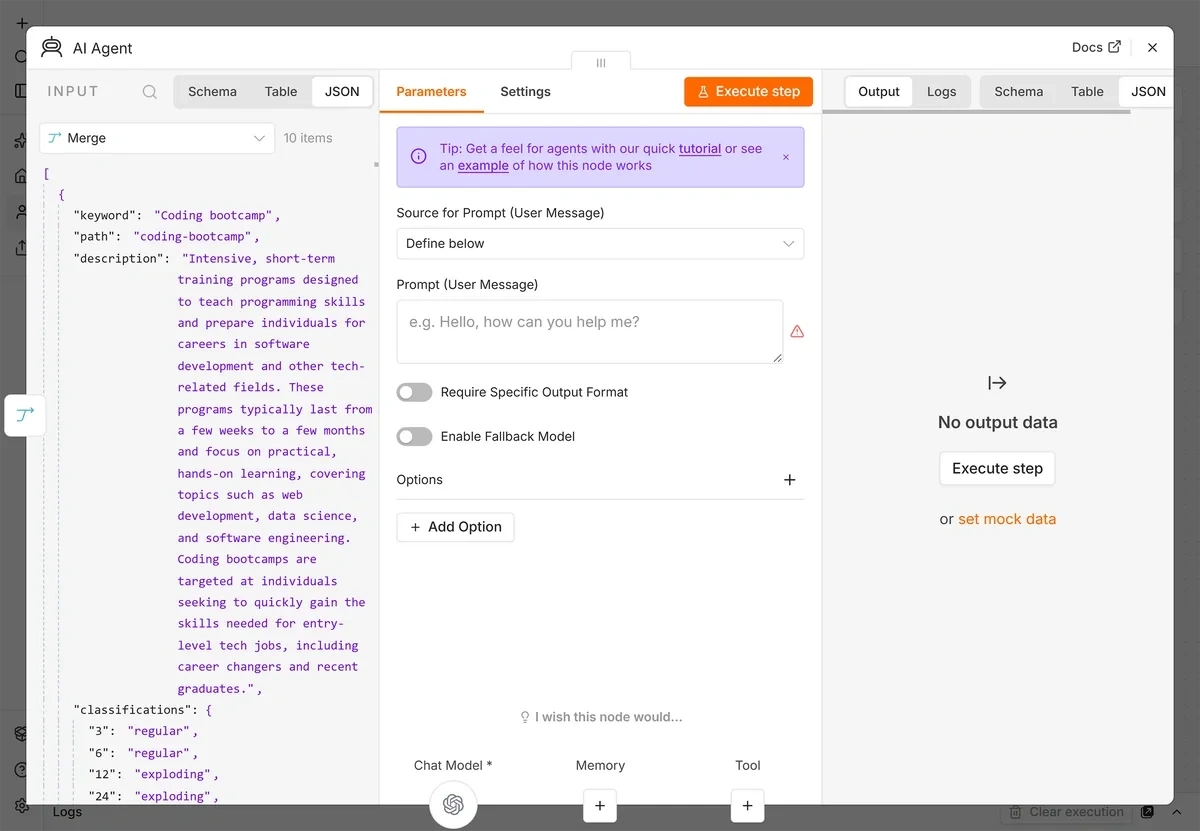
You’ll then need to write your prompt in the field provided. This is entirely customizable, but should include the following:
- Background information about your brand to help the AI with its trend validation
- Which data points the AI should use to calculate a trend validation score (and how to weigh them if you’re not placing the same amount of importance on each)
- Specifications on how to format the final scores for your trends
You’ll also need to use parameters from your data as placeholders in your prompt so the AI knows which data to pull in and analyze.
Below is the prompt I’ve used for my example. It’s a bit on the simple side, and I would recommend adding more brand context to get better results from your own AI agent. For example, you may wish to list your top three competitors and define your brand position and/or values.
You are an expert content marketer for a blog focusing on emerging technology in the cybersecurity space. The blog's audience is primarily made up of developers and IT security professionals.
Using the data from Exploding Topics and Semrush provided below, complete a trend validation for {{ $json.keyword }}. Then assign a numeric score to the trend using the following criteria:
If {{ $json.key_indicators.growth }} = "exploding", give one point.
If {{ $json.key_indicators.speed }} = "constant", give one point.
If three or more of the following are greater than 1, give one point: {{ $json.channelBreakdown.facebook }} {{ $json.channelBreakdown.instagram }} {{ $json.channelBreakdown.linkedin }} {{ $json.channelBreakdown.pinterest }} {{ $json.channelBreakdown.reddit }} {{ $json.channelBreakdown.tiktok }} {{ $json.channelBreakdown.twitter }} {{ $json.channelBreakdown.youtube }}.
If {{ $json.data.search_volume }} is over 500, give one point.
If {{ $json.data.search_volume }} is over 1,000, give an additional point.
If {{ $json.data.keyword_difficulty }} is less than 50, give one point.
If {{ $json.data.keyword_difficulty }} is less than 30, give an additional point.
If {{ $json.meta.keyword }} is relevant and interesting to my audience, give one point.
If competitors in my niche have content or products related to {{ $json.meta.keyword }}, give one point.
If {{ $json.meta.keyword }} aligns with my overall brand position (accessible, user-friendly content with actionable cybersecurity recommendations), give one point.
The final numeric score has a maximum point value of 10.
Format your response as "The trend validation score for {{ $json.keyword }} is X/10", where X is the score you've calculated based on the data provided above.
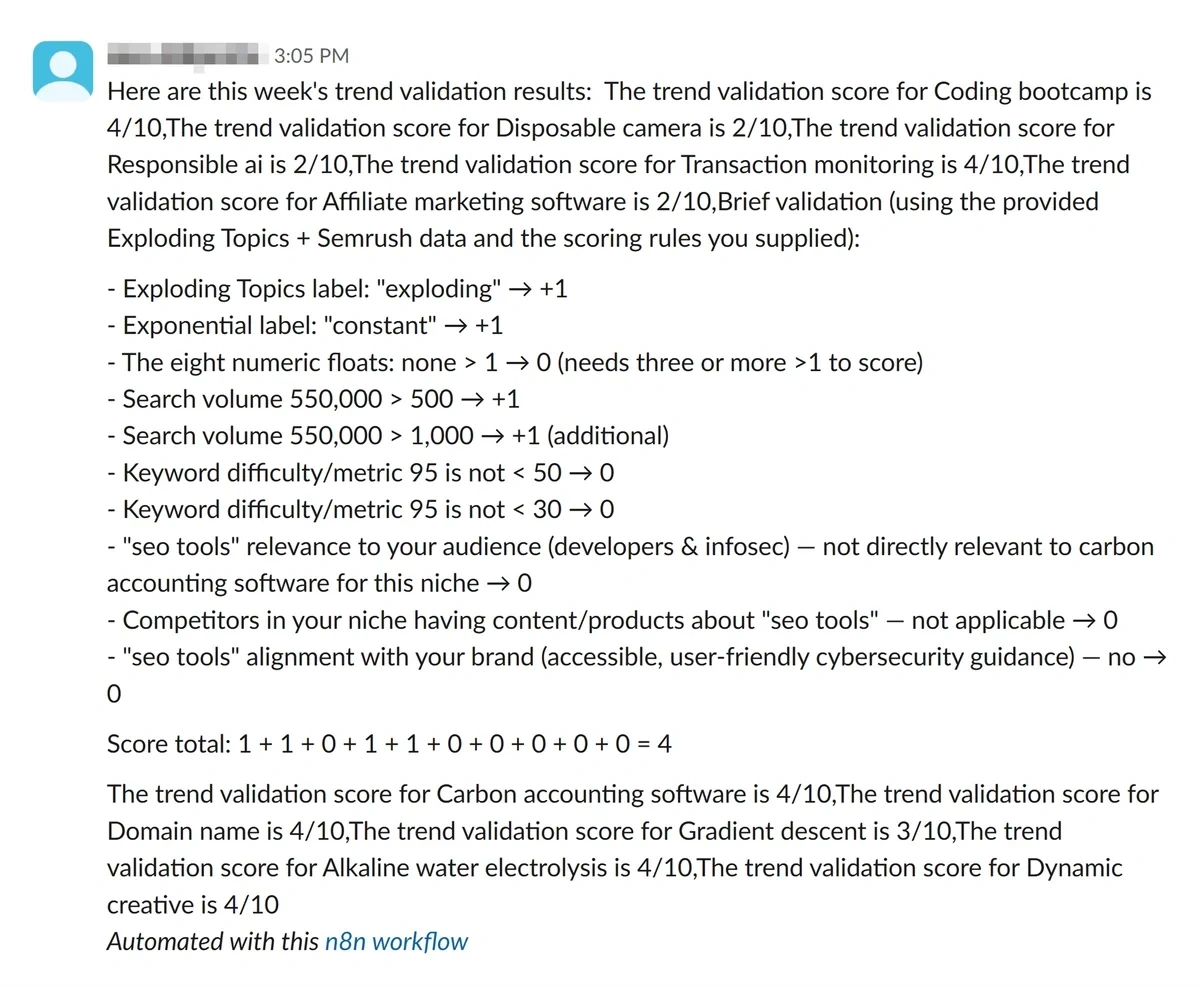
The AI Agent node automatically loops through each item from the input, so my output when I test this step is 10 nice, clean trend validation score statements.
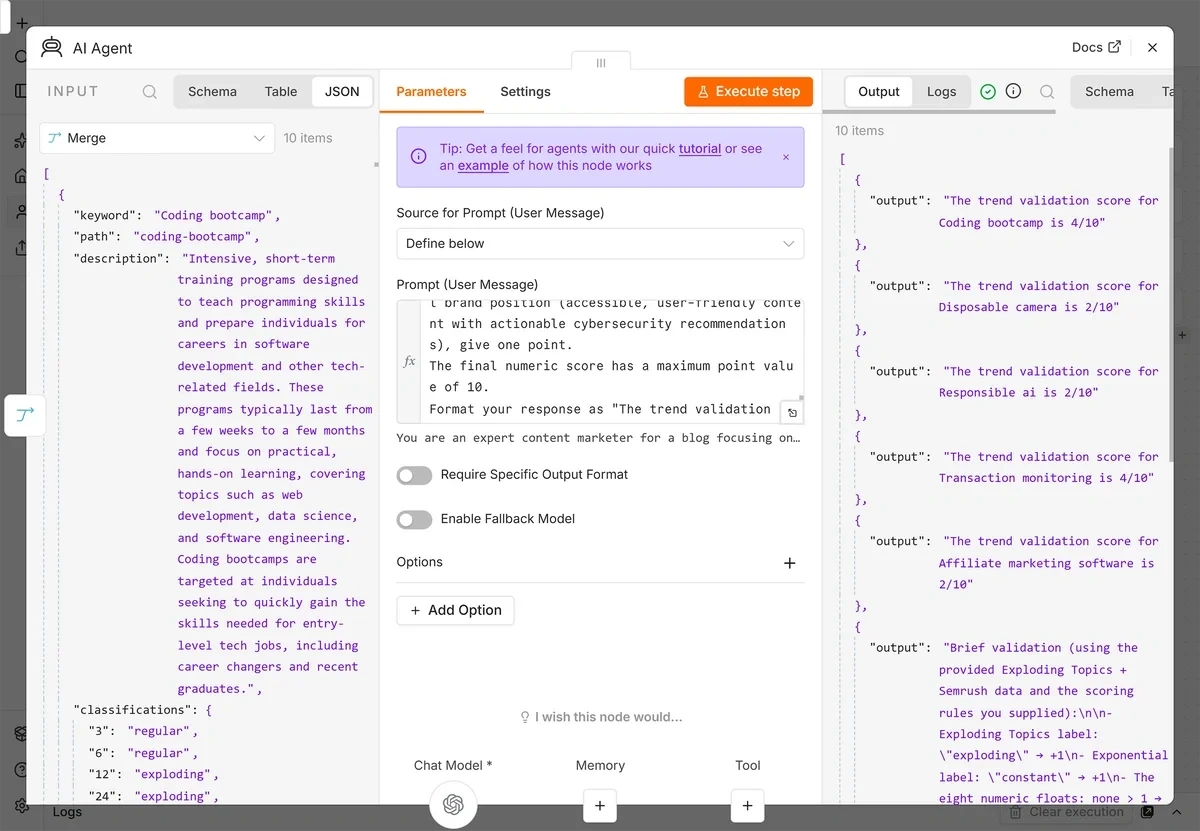
Note that it’s normal for this node to take a couple of minutes to run.
Connect OpenAI to n8n
If you determine that you need more than the 2,300 AI credits n8n provides with the Starter plan, you can either upgrade your n8n plan or connect n8n to your AI provider of choice.
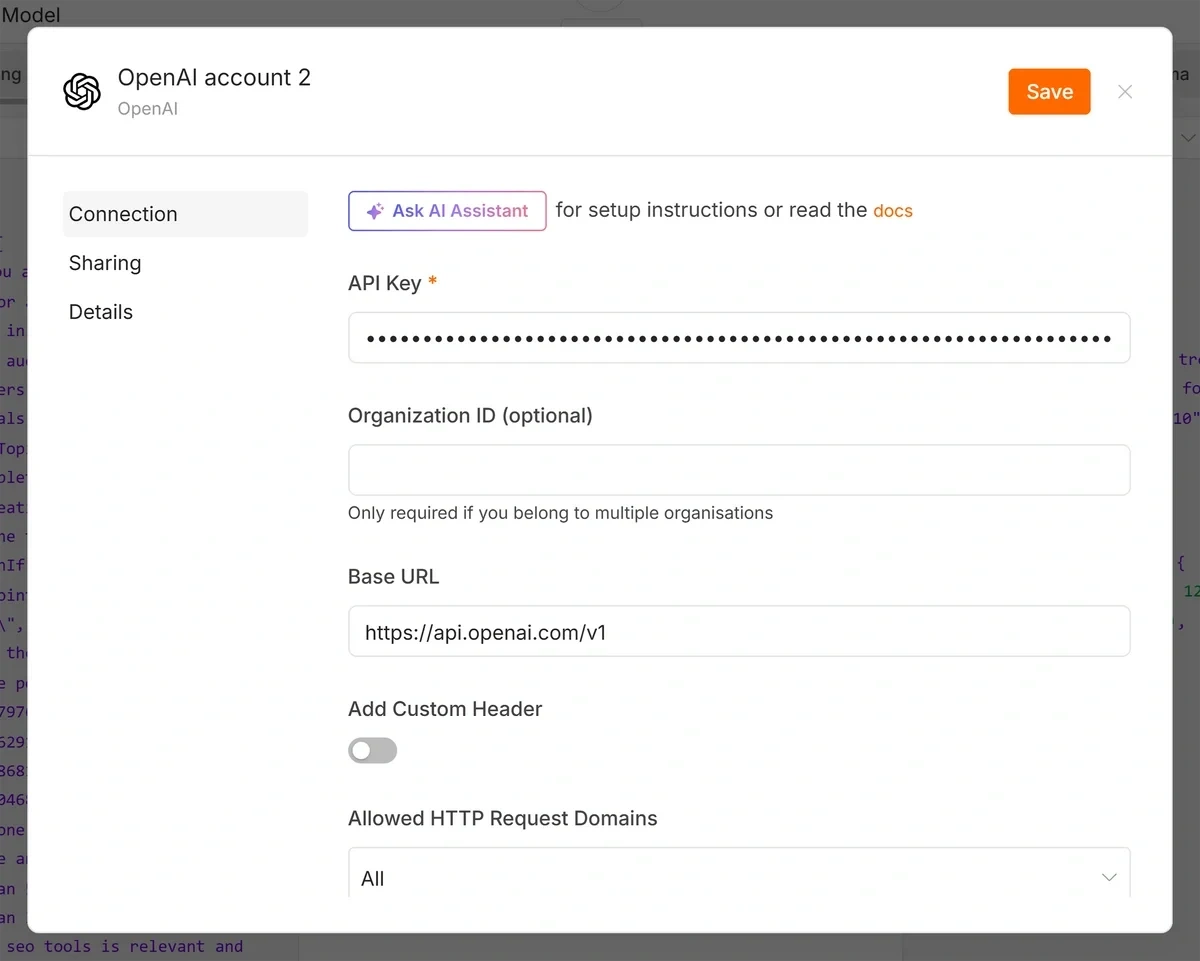
To connect your OpenAI account to your AI Agent node, open the configuration window for the agent’s chat model. From the Credential dropdown, select Create new credential.
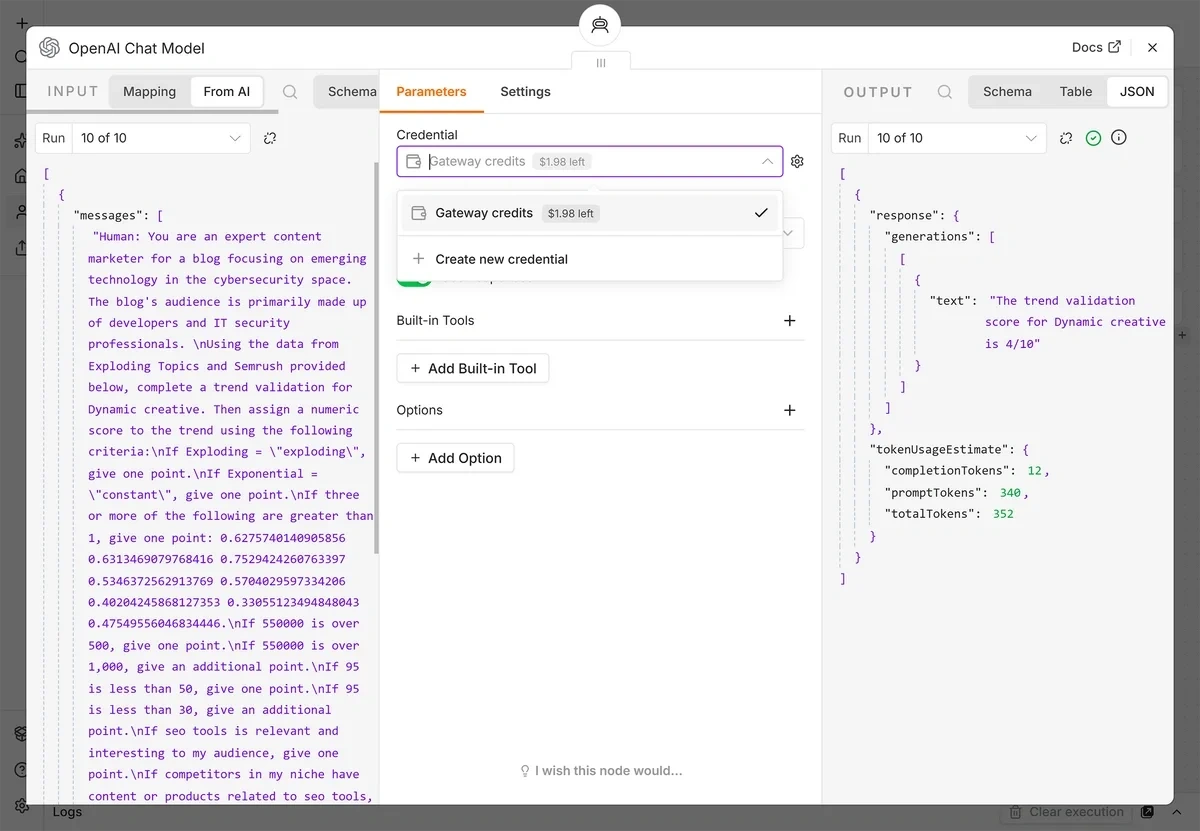
Log in to OpenAI API Platform and purchase credits if you haven’t already. Then create and copy your OpenAI API key (save it somewhere secure, as you won’t be able to access it again).
Paste the API key into the new credential window in n8n.
Step 7: Send Your AI Agent Output to Slack
Your trend validation AI agent is ready to run, but you need a way to see its results. There are several ways you could go about this, such as:
- Sending trend validation scores to a Google Sheet
- Adding trends and their validation scores to a project management app like Trello or Asana
- Setting up an automated message to your team’s communication platform
I’m going with the latter and connecting my n8n workflow to Slack to deliver my agent’s trend validation scores to a dedicated channel.
I’ve already created a channel in my Slack workspace called #trend-validation-results. Before I can send my scores to Slack, however, I need to turn my 10 items back into one item that I can add to my message.
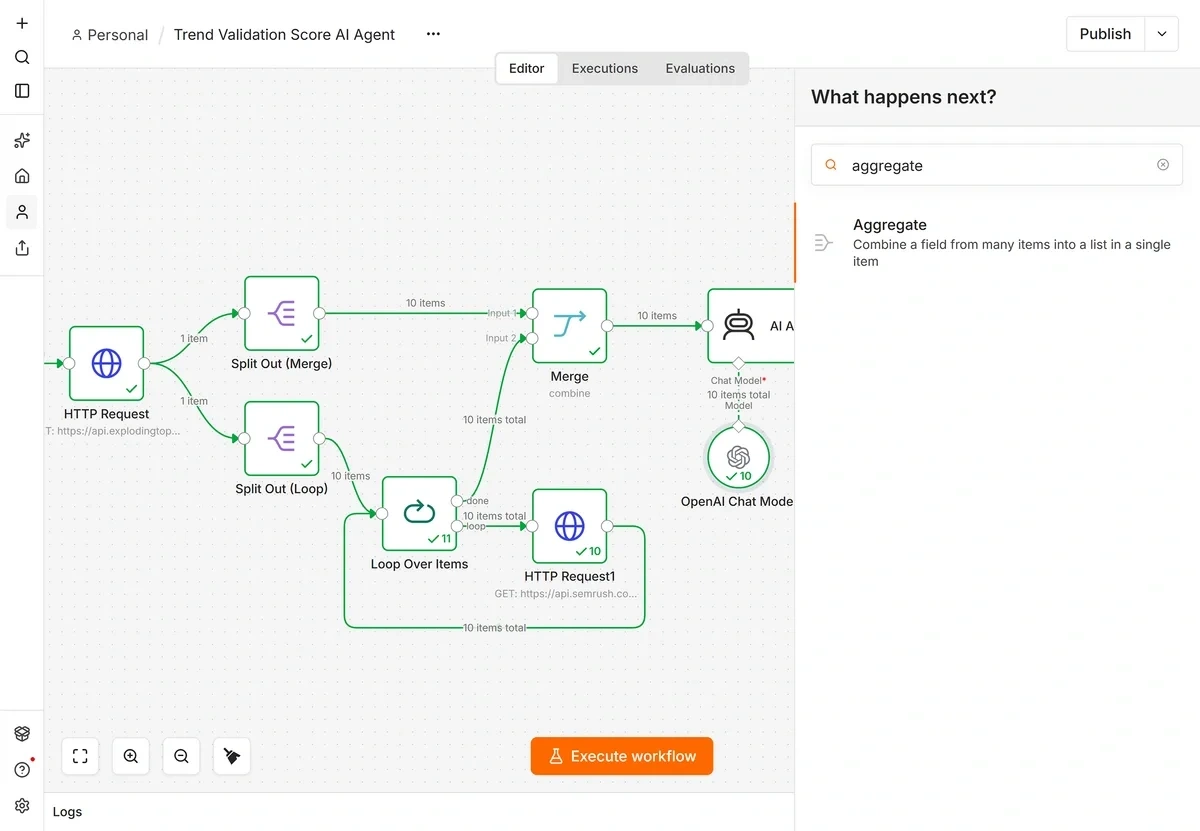
Click the plus (+) icon and search for and select the Aggregate node. This node is basically the opposite of the Split Out node we used earlier.
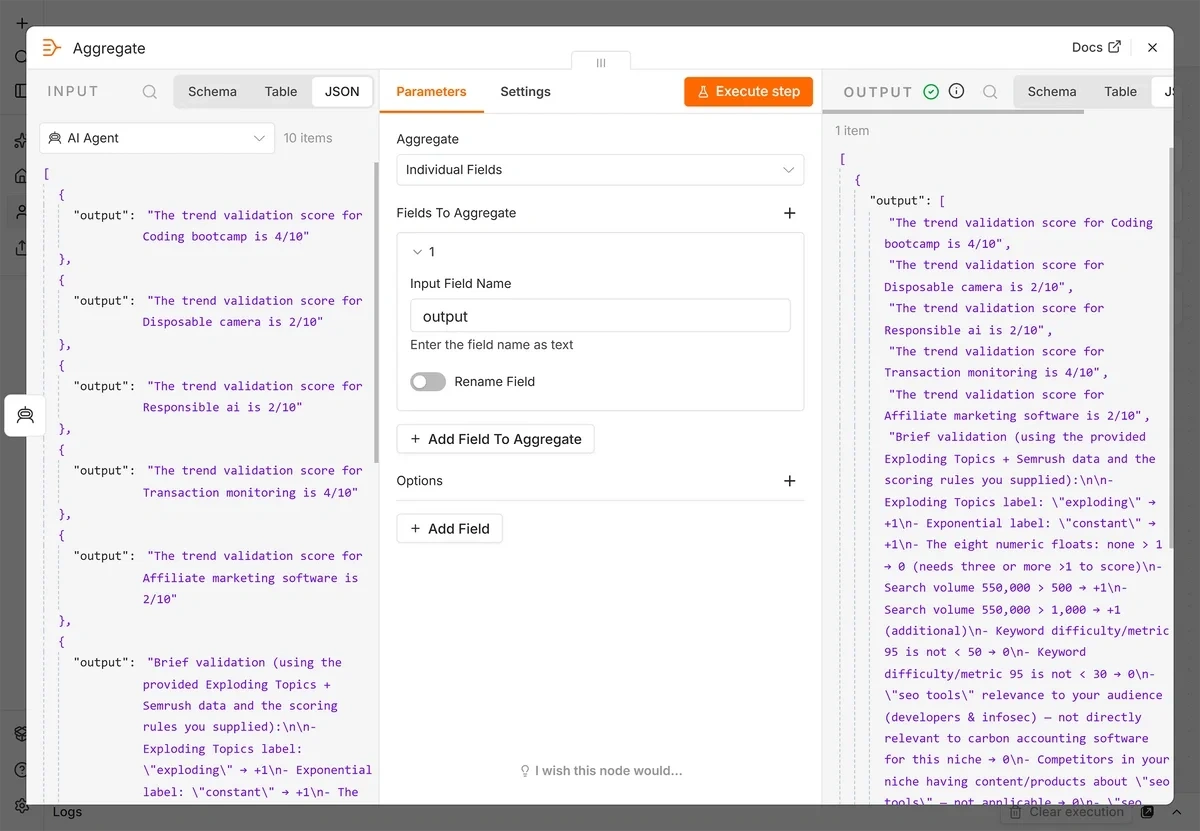
In the Input Field Name field, enter output. Then test the step to make sure the node returns a single item.
Once you see a success message for your Aggregate node, click the plus (+) icon one last time. Click Action in an app, then search for and select the Slack node.
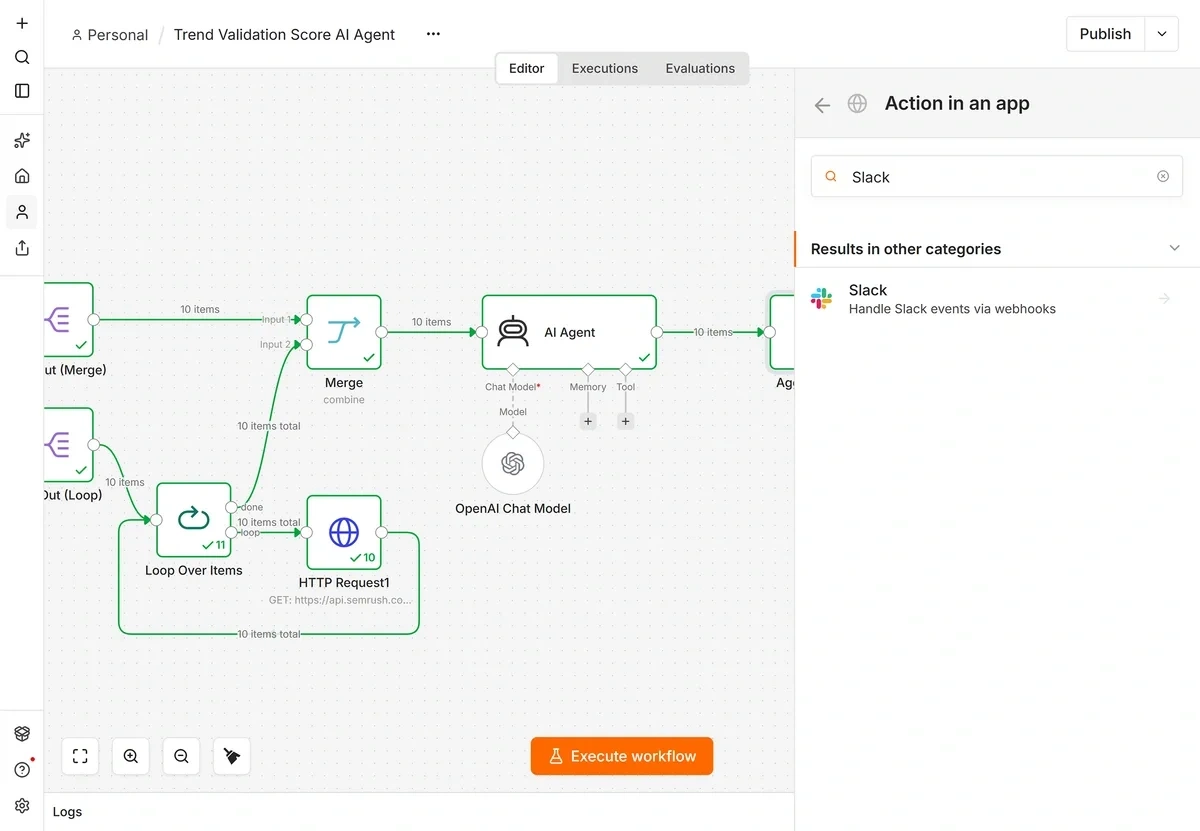
From the Actions menu, select Send a message.
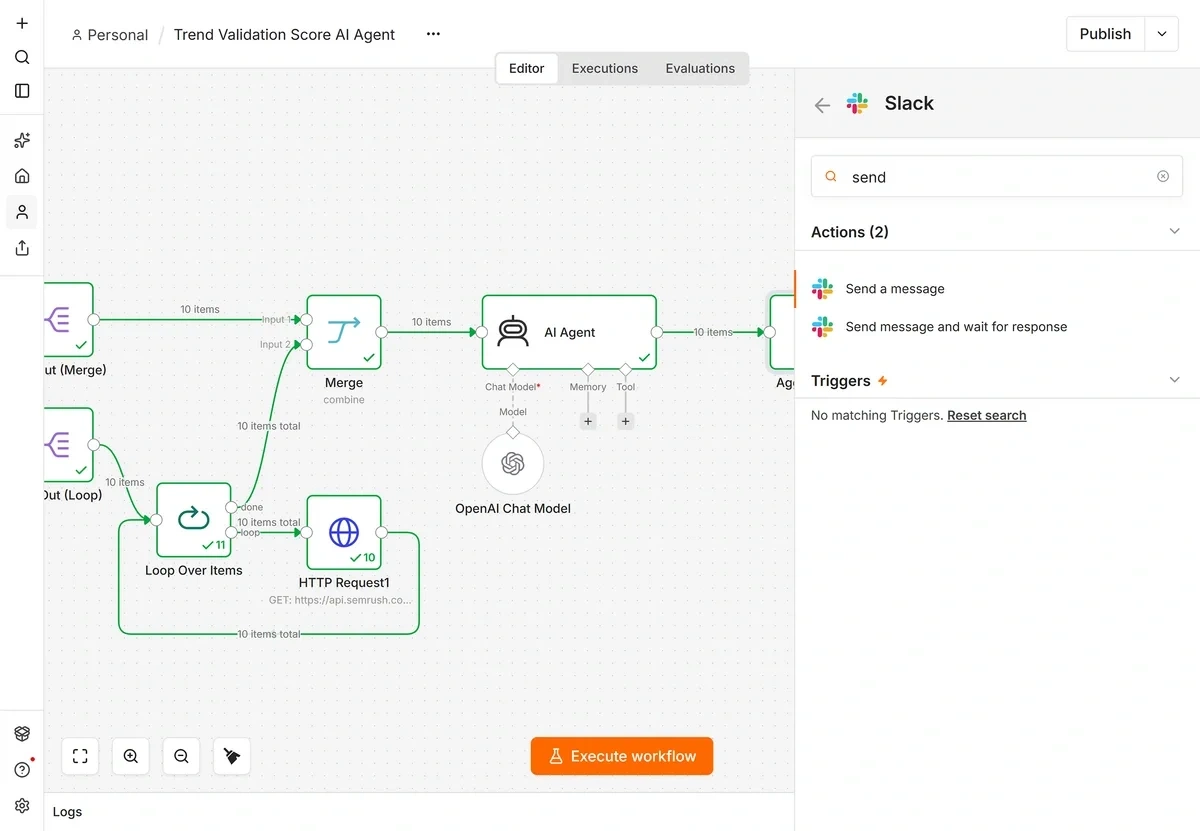
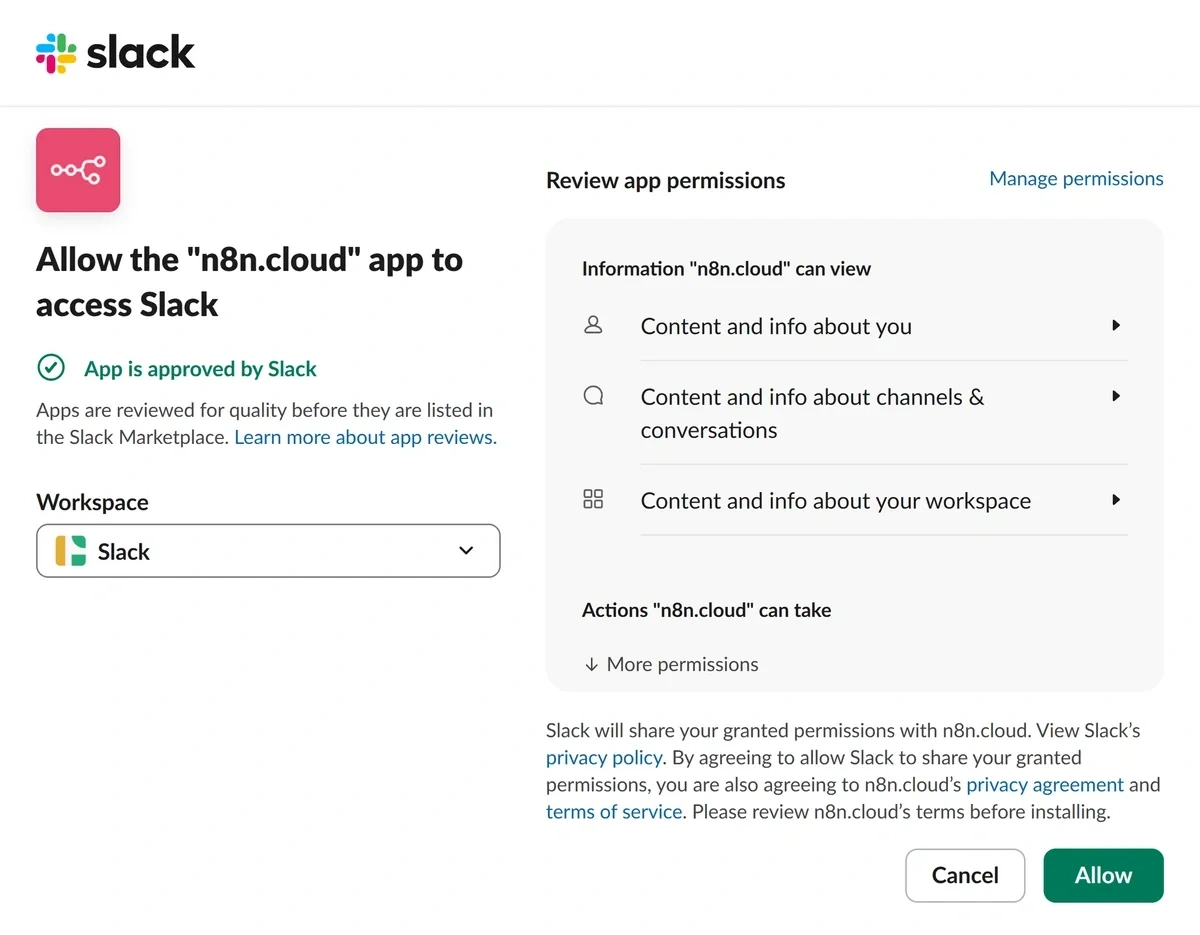
In the configuration window, select Connect to Slack from the Credential field. In the popup window, click Allow to give n8n permission to access it.
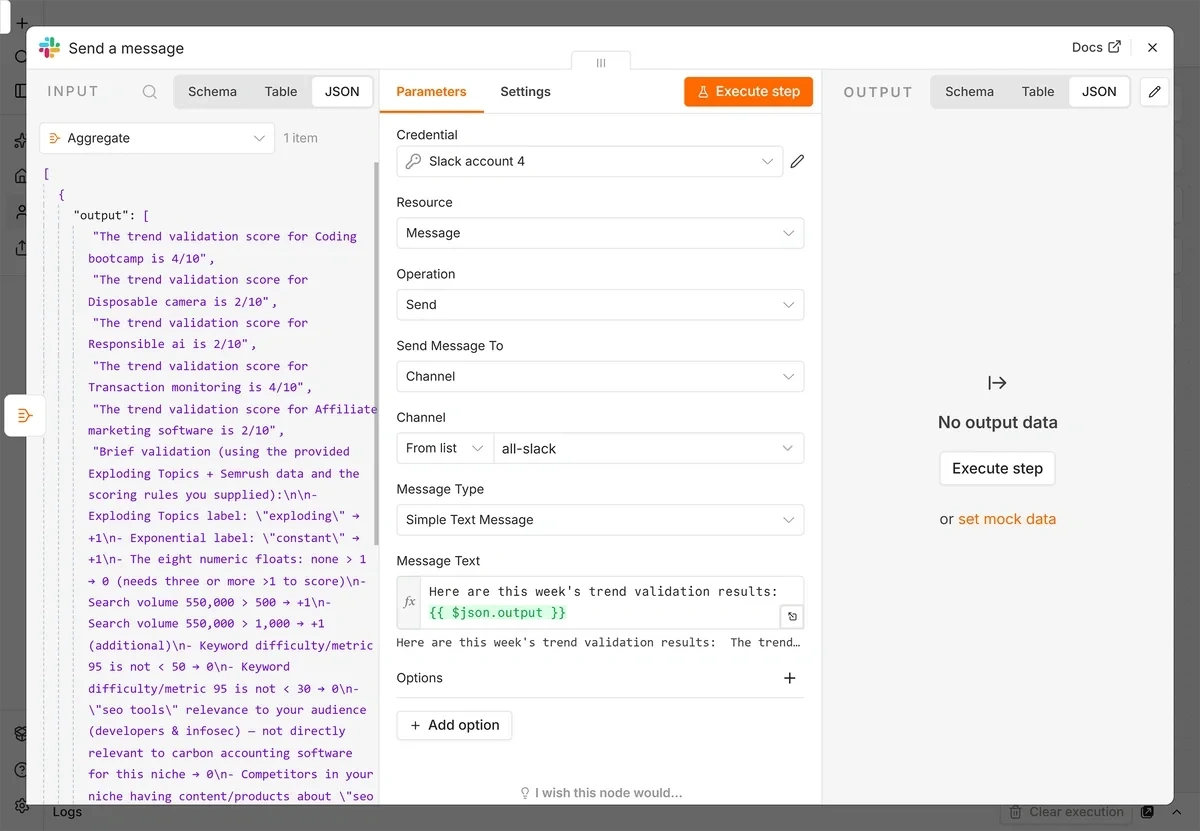
Then set the rest of the fields as follows:
- Resource: Message
- Operation: Send
- Send Message To: Channel
- Channel: From List: trend-validation-results (or whatever your Slack channel is named)
- Message Type: Simple Text Message
- Message Text: Here are this week's trend validation results: {{ $json.output }}
Test the node and check your Slack channel. You should see a message with the output from your trend validation AI agent.
Here’s a look at the completed workflow:
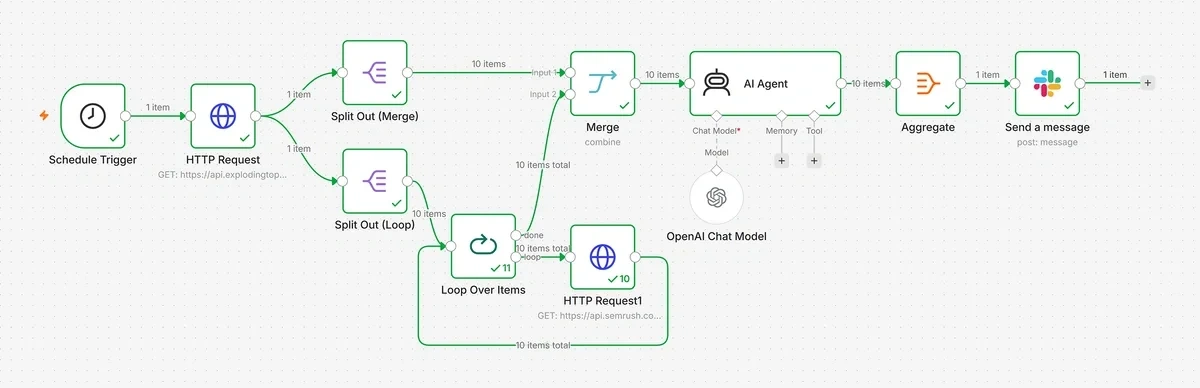
Remember to always follow up on top scoring trends with manual research to verify your scores, as AI can make mistakes (especially with subjective judgments like some of the criteria in the prompt I shared).
Automate Market Research and More With Exploding Topics Pro
Tools like Exploding Topics and Semrush offer goldmines of data to help you make important business decisions. You can inform your marketing strategy, discover competitive gaps that lead to new product ideas, or even find up-and-coming competitors in your niche.
Sifting through all of the available insights yourself while still making time for other tasks is a steep ask. That’s why Exploding Topics integrates with platforms like Zapier and n8n to help you automate some of the work and deliver only the most promising trends for further consideration.
Whether it’s a bit of market research or developing content briefs, Exploding Topics and n8n are up to the task. Sign up for a seven-day free trial of Exploding Topics Pro to see the difference for yourself!
Stop Guessing, Start Growing 🚀
Use real-time topic data to create content that resonates and brings results.

Exploding Topics is owned by Semrush. Our mission is to provide accurate data and expert insights on emerging trends. Unless otherwise noted, this page’s content was written by either an employee or a paid contractor of Semrush Inc.
Share
Newsletter Signup
By clicking “Subscribe” you agree to Semrush Privacy Policy and consent to Semrush using your contact data for newsletter purposes
Written By


Molly is a technical content writer with a passion for making technology easy for anyone to understand. She specializes in content... Read more